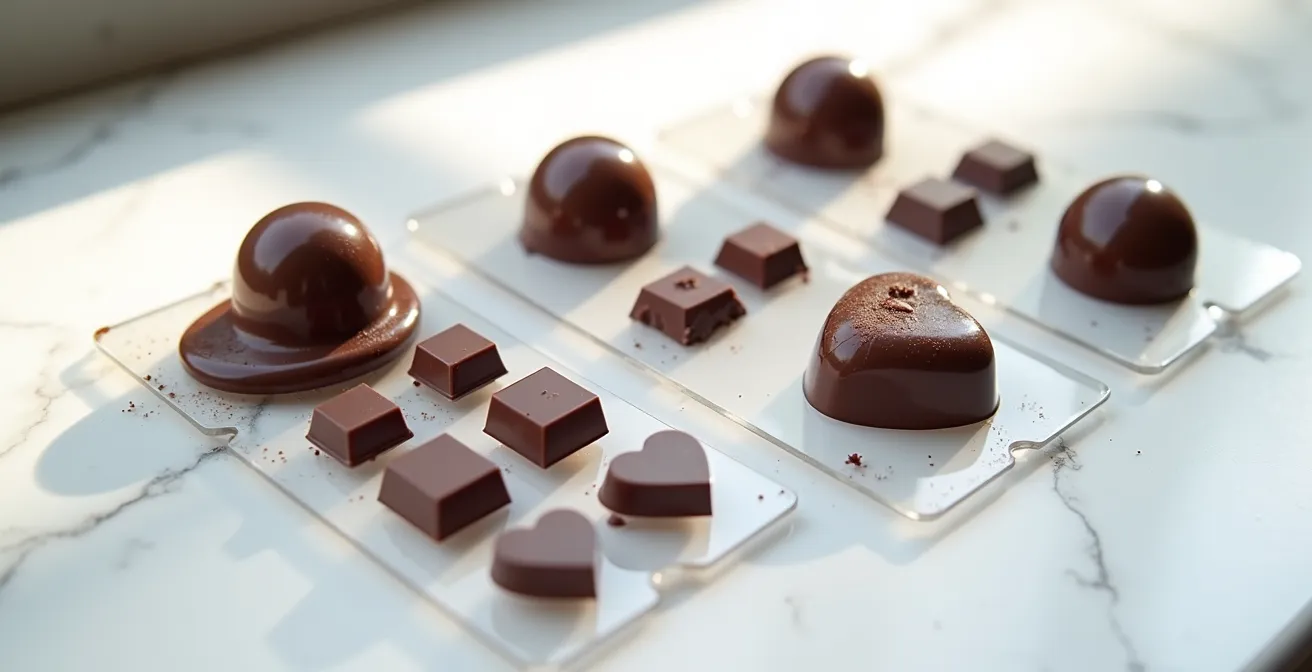
Achieving a professional, glass-like shine on chocolates is a matter of material physics, not just culinary skill.
- Polycarbonate’s superior thermal inertia ensures the slow, even cooling required for stable Beta V crystal formation—the source of both snap and shine.
- Its high surface energy allows tempered chocolate to spread perfectly, eliminating micro-defects and air bubbles for a flawless surface.
Recommendation: To transition from hobbyist results to professional quality, mastering the interaction with rigid polycarbonate molds is the single most critical step.
The frustration is palpable. You’ve spent hours perfecting your chocolate tempering, hitting the precise temperatures, and yet the final result is a batch of bonbons that are dull, streaked, or stubbornly stuck in their molds. For aspiring chocolatiers looking to elevate their craft from a hobby to a professional standard, this gap between effort and outcome can be disheartening. The common advice echoes across forums and tutorials: “temper correctly,” “keep your molds clean,” “tap out the air bubbles.” While essential, these instructions often miss the most critical variable in the equation: the mold itself.
Many begin with flexible silicone molds, prized for their easy release and low cost. However, this very flexibility is a fundamental barrier to achieving the hallmark of a high-end praline: a flawless, glass-like shine and a sharp, satisfying “snap.” The secret to that professional finish doesn’t lie in a secret technique, but in understanding the material science at play. The true key is the interaction between the crystalline structure of tempered chocolate and the physical properties of its container.
But what if the solution wasn’t about working harder at your technique, but smarter with your tools? The superiority of polycarbonate is not a matter of opinion; it is a consequence of physics. Its rigidity, thermal conductivity, and surface energy are specifically what enable the formation of a perfect chocolate shell. Silicone, by its very nature, works against these principles.
This guide will deconstruct the process of creating molded chocolates from a material engineering perspective. We will move beyond the basic “how-to” and explore the scientific “why” behind each step. From the specific way you clean the mold to the method used for scraping, you will learn how each action is a deliberate manipulation of thermal dynamics and surface physics, proving why polycarbonate is the non-negotiable standard for professional quality.
To fully grasp the principles that separate amateur results from professional mastery, this article breaks down the key technical stages. The following summary outlines the journey from basic mold maintenance to the science behind the perfect crystalline structure.
Summary: Mastering the Physics of Professional Chocolate Molding
- Coton ou microfibre : comment entretenir vos moules pour garantir le démoulage ?
- Comment chasser les micro-bulles d’air qui ruinent la surface de vos pralines ?
- L’erreur de remplissage qui crée des fonds de coques trop épais et désagréables
- Poche à douille ou louche : quel outil pour garnir 50 empreintes sans déborder ?
- Quand taper le moule : les signaux qui prouvent que le chocolat est rétracté
- Bulles d’air ou texture lisse : pourquoi investir dans un mixeur sous vide change la conservation ?
- Comment racler le moule pour avoir un fond plat et hermétique ?
- How to Create a Thin and Snappy Shell for Belgian Molded Chocolates?
Coton ou microfibre : comment entretenir vos moules pour garantir le démoulage ?
The pursuit of a mirror-like shine begins before chocolate even enters the mold. Professional mold maintenance is not simple cleaning; it is surface conditioning. The goal is to preserve the perfectly smooth, non-porous surface of the polycarbonate, as any microscopic imperfection will be transferred to the chocolate. This is why the choice between cotton and microfiber is not trivial. Microfiber cloths, while excellent for many cleaning tasks, generate static electricity on polymer surfaces like polycarbonate. This static charge can attract airborne dust particles and, more importantly, interfere with the even spreading of the chocolate.
In contrast, cotton is a natural, anti-static material. Polishing a clean, dry polycarbonate mold with a soft cotton ball or cloth does two things: it removes any residual microscopic water spots or fats, and it buffs the existing, invisible layer of cocoa butter into the mold surface. This creates an ideal, ultra-smooth face for the tempered chocolate to bond with temporarily. According to professional chocolatiers, using the right material is critical; they report that cotton reduces static by 85% compared to microfiber, preventing surface flaws before they happen. Treating your molds as precision instruments is the first step toward professional results.
Action Plan: Professional Mold Maintenance Protocol
- Rinse molds with warm water (below 60°C) immediately after use to prevent chocolate residue from hardening.
- Use a mild, unscented dish soap with a soft cotton cloth, strictly avoiding abrasive sponges or microfiber cloths that can create micro-scratches and static electricity.
- Dry the molds thoroughly with a separate, clean cotton cloth or a warm air blower to eliminate any possibility of water spots, which ruin the chocolate’s shine.
- Polish each cavity with a clean cotton ball to buff the microscopic layer of residual cocoa butter into the surface, creating a perfect release-ready finish.
- Store molds flat in a cool, dry place, away from direct sunlight or dust, to protect the pristine surface until the next use.
Comment chasser les micro-bulles d’air qui ruinent la surface de vos pralines ?
Micro-air bubbles are the nemesis of a flawless chocolate surface, creating tiny pits that diffuse light and destroy the potential for a high-gloss finish. While tapping the mold is the standard method for dislodging them, the real professional technique lies in preventing them from getting trapped in the first place. This is governed by a physical property known as surface energy. Polycarbonate has a very high surface energy, while tempered chocolate has a specific surface tension. When conditions are right, the chocolate is naturally attracted to the mold surface, causing it to “wet” the polycarbonate and spread evenly, displacing tiny air pockets as it flows.
The key to facilitating this process is managing the temperature differential. Callebaut’s professional protocol, for instance, recommends pre-warming the polycarbonate molds to 26-27°C before filling them with dark chocolate tempered at 31-32°C. This slight warmth reduces the chocolate’s viscosity upon contact, allowing its surface tension to overcome any trapped air. The warm mold ensures the chocolate flows into every corner and crevice before it begins to set, creating an uninterrupted, perfect negative of the mold’s glossy interior. The firm tapping afterwards is then only to release any larger, more stubborn bubbles that were incorporated during filling.
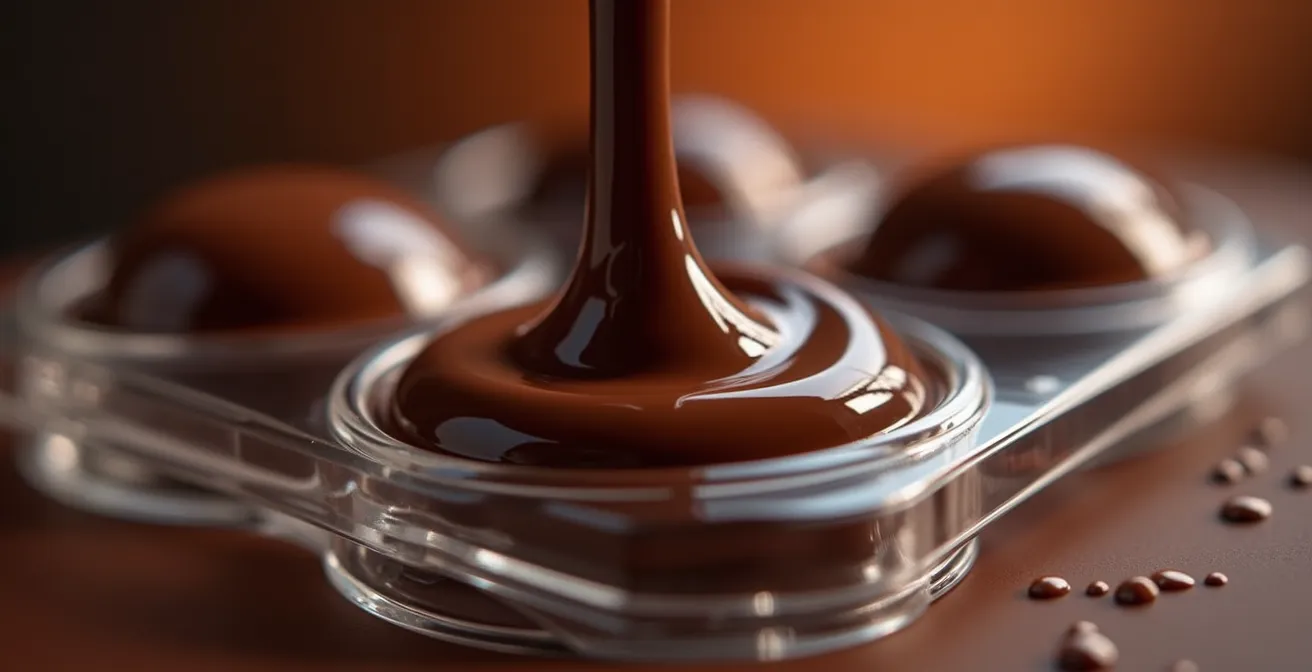
As this magnified view illustrates, the goal is to have the liquid chocolate flow seamlessly across the mold’s surface. A correct temperature differential ensures the chocolate has enough time and low enough viscosity to achieve this perfect spread, naturally pushing air out of its way. This initial contact is where the foundation for a mirror shine is either established or lost.
L’erreur de remplissage qui crée des fonds de coques trop épais et désagréables
A common flaw in amateur molded chocolates is an overly thick base, creating a poor texture and an unpleasant eating experience. This is often not a sign of poor draining, but a result of a specific physics-related error during filling: the creation of excess hydraulic pressure. When a mold is filled to the brim and then inverted to drain the excess chocolate, a column of draining liquid is formed. This column has weight, and its weight creates pressure.
When the mold is inverted, the weight of the column of draining chocolate creates hydraulic pressure, preventing chocolate at the rim from draining effectively.
– TCF Sales Technical Team, TCF Sales Professional Chocolate Molding Guide
This hydraulic pressure is most pronounced at the opening of the cavity (the future base of the praline). It effectively holds a thicker layer of chocolate against the mold, preventing it from draining as thinly as the sides. The problem is exacerbated if the mold is cold, as the chocolate near the rim begins to set almost immediately, thickening the base even further before it has a chance to drain. To combat this, professionals not only avoid overfilling but also control the mold’s temperature. In fact, temperature control studies show that molds at 26-28°C produce shells 40% thinner than cold molds, precisely because they allow the chocolate to drain more evenly before setting begins.
Poche à douille ou louche : quel outil pour garnir 50 empreintes sans déborder ?
When scaling up production, the choice of filling tool becomes a question of efficiency, accuracy, and thermal control. A ladle is fast for bulk filling but notoriously imprecise, leading to drips and inconsistent fill levels. A piping bag offers high precision but is slow and can cause hand fatigue during large batches, and the chocolate within it cools rapidly. For professional work, where consistency across dozens or hundreds of cavities is paramount, the optimal tool is the piston or confectionery funnel.
The piston funnel combines the speed of a ladle with the precision of a piping bag. It allows the chocolatier to dispense a consistent, repeatable volume of chocolate with a simple press of a lever, directly into the cavity with no drips or overflow. This not only keeps the workspace clean but, more importantly, ensures that every shell starts with the same amount of chocolate, leading to uniform thickness after draining. Furthermore, its larger volume and often double-walled construction provide better thermal stability, keeping the tempered chocolate at its ideal working temperature for longer. The table below, based on data from professional equipment suppliers, outlines the trade-offs.
| Tool | Speed (50 cavities) | Accuracy | Ergonomics | Temperature Control |
|---|---|---|---|---|
| Ladle | 5 minutes | Low (drips common) | Good for short sessions | Poor (rapid cooling) |
| Piping Bag | 15 minutes | High | Poor (hand fatigue) | Moderate |
| Piston Funnel | 8 minutes | Excellent | Excellent | Good (maintains temp) |
Quand taper le moule : les signaux qui prouvent que le chocolat est rétracté
The magical moment of demolding, where perfectly shiny chocolates release effortlessly, is not magic at all; it’s a direct result of physics. The phenomenon is known as crystalline contraction. As correctly tempered chocolate cools and solidifies in the mold, its cocoa butter molecules arrange themselves into a dense, stable crystal structure known as Beta V. This specific crystalline lattice is not only responsible for the snap and gloss but is also physically more compact than the liquid chocolate. Consequently, as the chocolate hardens, it naturally shrinks and pulls away from the walls of the mold.
This is why a rigid polycarbonate mold is essential. The mold provides a fixed, unyielding surface against which the chocolate can contract. If you were to use a flexible silicone mold, the mold would shrink and deform *with* the chocolate, preventing a clean separation and causing the chocolate to stick. The signal for successful contraction is visual: you will see small air gaps appear between the chocolate and the mold, particularly at the bottom and sides. The base of the chocolate will often look frosted or hazy through the clear polycarbonate. This is the sign that the bond has been broken. A gentle tap on the workbench should be all that is needed for the chocolates to fall out. If they don’t, it’s a clear indication of improper tempering or cooling, as the necessary crystal structure and subsequent contraction did not occur.
Bulles d’air ou texture lisse : pourquoi investir dans un mixeur sous vide change la conservation ?
While the shell is critical, the quality of the filling, or ganache, is equally important for the overall stability and shelf life of a praline. A primary cause of spoilage in ganaches is the presence of microscopic air bubbles. These bubbles not only harbor bacteria but also contain water, increasing the overall water activity (a_w) of the filling and accelerating spoilage. A vacuum mixer addresses this at a fundamental level by removing air during the emulsification process. The result is a denser, smoother, and more stable ganache. In fact, professional chocolate production data reveals that vacuum mixing reduces water activity by 35%, which can extend the shelf life of a typical ganache from just two weeks to over six weeks.
Beyond shelf life, the structural integrity of the ganache is vital. Air bubbles create weak points in the emulsion. A denser, air-free ganache created under vacuum has a more uniform density, which ensures it contracts evenly as it cools inside the delicate chocolate shell. This uniform contraction prevents the filling from creating internal stress points that could crack the shell from the inside out—a common but often misdiagnosed problem.
Case Study: Emulsion Stability in Professional Ganache Production
An analysis by Gloria’s Cake & Candy Supplies documents that vacuum-mixed ganaches maintain stable emulsions three times longer than ganaches mixed with a traditional immersion blender. The physical removal of microscopic air pockets creates a denser, more tightly bound emulsion that prevents the fat and cocoa solids from separating over time. This superior structural stability is crucial, as it ensures the ganache contracts uniformly during cooling, significantly reducing the risk of it pulling away from the shell unevenly and causing internal stress fractures in the fine polycarbonate-molded shells.
Comment racler le moule pour avoir un fond plat et hermétique ?
The final scraping of the mold is a step that defines the “foot” of the praline and creates the hermetic seal that protects the filling. A sloppy scrape leaves a messy, uneven edge that is prone to breaking and allows air to reach the ganache. The professional standard is a two-pass technique using a rigid metal scraper. Plastic or flexible scrapers are inadequate as they can bend over the cavities, leaving a thin film of chocolate instead of a clean, sharp edge. Indeed, professional testing demonstrates that metal scrapers create a 95% hermetic seal, compared to an average of only 80% with plastic scrapers.
The technique itself requires precision and confidence. It is not a sawing or scrubbing motion, but a deliberate, clean pull across the mold. The timing of the two passes is critical to success.
- First Pass: Immediately after filling the shells with ganache and before the chocolate “cap” is applied, use a scraper at a 45-degree angle to quickly remove any bulk excess ganache or chocolate from the surface of the mold. This pass is about speed and bulk removal.
- Wait and Set: After applying the final chocolate layer to seal the pralines, wait 30-60 seconds. You want the surface to become slightly matte, indicating the chocolate is just beginning to set but is not yet hard.
- Second Pass: Use a clean, sharp metal scraper held at a low 15-degree angle. Apply firm, consistent pressure and execute a single, confident pull across the short axis of the mold. This low angle and firm pressure will shear off the excess chocolate, creating a perfectly flat and sealed base.
- Tool Check: Before every use, check the edge of your metal scraper for nicks or burrs. Even a tiny imperfection will drag through the chocolate and create lines, ruining the perfect seal.
This meticulous process ensures each praline has a clean, professional finish and a seal that maximizes its shelf life. It is a testament to the fact that in high-end chocolate work, every detail matters.
Key Takeaways
- Polycarbonate’s superiority is rooted in its physical properties: high thermal inertia for controlled cooling and high surface energy for a flawless gloss.
- Professional technique involves managing temperature differentials, pressure, and surface interactions, not just following recipe steps.
- Every detail, from using a cotton cloth for cleaning to a metal scraper for sealing, is a deliberate choice to control the final crystal structure of the chocolate.
How to Create a Thin and Snappy Shell for Belgian Molded Chocolates?
We arrive at the ultimate goal: a shell that is simultaneously thin, glossy, and delivers a resounding “snap.” These three qualities are not independent; they are all direct results of a single achievement: the formation of a dense and stable Beta V crystal structure in the cocoa butter. This perfect crystalline state can only be achieved through a controlled cooling process, a process for which polycarbonate’s material properties are uniquely suited. The material’s high thermal mass, or thermal inertia, means it resists rapid temperature changes. It cools the chocolate slowly and evenly, giving the Beta V crystals ample time to form and align perfectly.
Contrast this with silicone, which has low thermal inertia and cools down too quickly, or with metal molds, which can cool too aggressively. Both scenarios “shock” the chocolate, promoting the formation of unstable crystal forms that result in a dull finish, a soft texture, and poor contraction. Professional cooling tunnels are designed to optimize this process. As a matter of fact, TCF Sales technical data shows that cooling at 12-15°C with active air circulation provides the ideal environment, producing shells that are up to 30% thinner and 50% snappier than those cooled at standard refrigerator temperatures.
The ‘snap’ is the audible result of a dense, stable Form V beta crystal structure. This same dense, uniform structure creates a perfectly flat, non-porous surface that reflects light perfectly – this is the ‘shine’.
– Micelli Chocolate Mold Company, Professional Chocolate Molding Technical Guide
Ultimately, the polycarbonate mold is not just a container; it is an active tool in the crystallization process. Its rigidity provides the scaffold for contraction, its clarity allows you to monitor the process, and its thermal properties guide the chocolate toward its most perfect physical state. The shine and snap are not an artistic flourish, but the physical evidence of a process executed with scientific precision.
To elevate your craft, the next logical step is to equip your workshop with the materials that enable professional results. Invest in professional-grade polycarbonate molds and apply these material-science principles to unlock a new level of quality and consistency in your creations.