In summary:
- The perfect velvet finish relies on a precise temperature difference (thermal shock) between a hot spray (45-50°C) and a frozen dessert (-18°C).
- Forget the rigid 50/50 rule; the ideal chocolate-to-cocoa-butter ratio is dictated by your chocolate’s specific fluidity (drop system).
- Equipment matters: HVLP guns offer the best control over particle atomization, directly impacting the fineness of your texture.
- Cracking on defrost is caused by a too-thick application. The key is multiple, swift, ultra-thin layers, not one heavy coat.
- The internal structure of your entremet is paramount. Properly frozen layers prevent collapse and ensure a flawless canvas for the velvet effect.
The velvet finish is the cashmere sweater of modern patisserie. It’s a texture that whispers sophistication, transforming a simple entremet into a piece of edible art. For any ambitious pastry chef, mastering this technique is no longer optional; it’s a vital part of a modern visual vocabulary. You’ve likely heard the standard advice: melt a 50/50 mix of chocolate and cocoa butter, grab a spray gun, and coat a frozen cake. While technically correct, this approach is merely a recipe, and recipes rarely create masterpieces.
Following these basic steps often leads to frustrating results: a texture that’s too coarse, a finish that cracks upon defrosting, or a color that looks flat and uninspired. The internet is filled with tutorials that show you the ‘what’ but seldom explain the ‘why’. They give you the notes but not the music. This is where a shift in perspective is required. True mastery of the velvet effect isn’t about blindly following a ratio; it’s about understanding and controlling the underlying physics of the technique.
This guide deconstructs the art and science of the velvet finish. We will move beyond generic instructions to explore the dynamics of thermal shock, the science of particle atomization, and the design principles of layering. You will learn not just how to create a velvet finish, but how to sculpt it, color it, and ensure it remains flawless from freezer to plate. It’s time to stop coating desserts and start designing textures.
For those who prefer a visual demonstration, the following video offers an excellent look at the spraying technique in action, perfectly complementing the detailed principles we are about to explore.
This comprehensive guide will walk you through every critical aspect of achieving a professional velvet texture. From the foundational science to advanced customization, each section is designed to build your expertise, giving you the confidence to create consistently stunning results.
Summary: A Designer’s Guide to the Velvet Finish
- Why the ratio 50% chocolate 50% cocoa butter is the norm for pulverizing?
- Why the entremets must be frozen at -18°C for the velvet to stick?
- Low pressure or compressor: which equipment for a fine and regular grain?
- The thickness error that cracks your velvet shell on thawing
- Paint booth or cardboard: how to spray without repainting the whole kitchen?
- How to read the drop system on the packages to never mistake the use?
- How to infuse matcha tea or herbs into white chocolate without altering the texture?
- How to Layer Mousse, Creamy, and Crunch Without Collapsing the Cake?
Why the ratio 50% chocolate 50% cocoa butter is the norm for pulverizing?
The “50/50” rule is the most repeated mantra in velvet spray tutorials, but it’s more of a well-intentioned guideline than a professional standard. It exists because it provides a reliable starting point for achieving the right viscosity. The goal of adding cocoa butter is simple: to thin the chocolate enough so it can be atomized into a fine mist by the spray gun. A 50/50 ratio typically works for most standard dark or milk chocolates.
However, relying on this single ratio is the difference between an amateur and a designer. The true professional standard is more nuanced. For instance, Callebaut’s professional recommendation is often a 60% chocolate to 40% cocoa butter mix, because their chocolate couvertures are designed with a specific fluidity. The secret isn’t a magic ratio, but a target texture: a liquid that is fluid like milk but still rich enough to provide coverage.
Your ratio should be a dynamic variable, adjusted based on the chocolate you’re using (dark chocolate is naturally more fluid than white), the desired texture (a coarser, sand-like effect might use less cocoa butter), and even your equipment’s nozzle size. Always maintain the mixture’s temperature between 30-32°C during application to ensure this viscosity remains stable. Thinking of the ratio as a starting point for your own ‘house blend’ is the first step toward a signature finish.
Why the entremets must be frozen at -18°C for the velvet to stick?
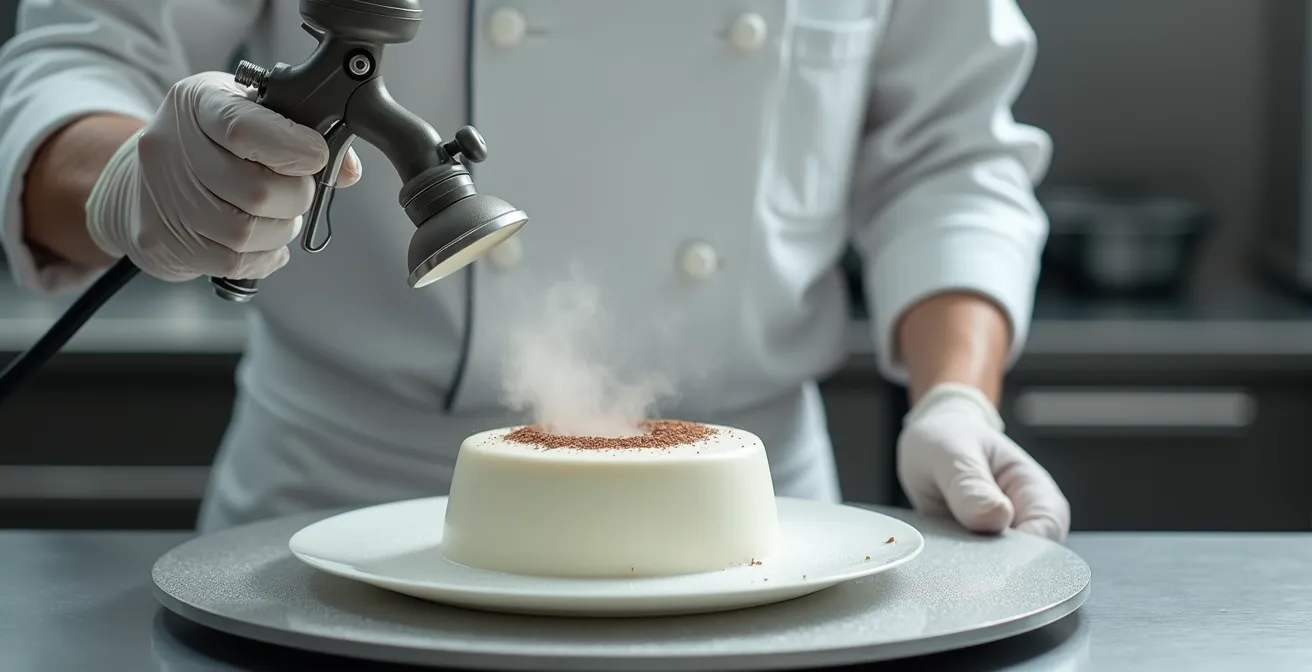
The velvet effect is not a coating; it’s a creation born from a controlled, violent reaction. The magic lies in thermal shock dynamics. When the warm, atomized chocolate mist (at around 45°C) hits the rock-solid, frozen surface of the entremet (at -18°C), the cocoa butter in the droplets crystallizes almost instantaneously. It’s this rapid solidification that prevents the droplets from flattening out and merging. Instead, they freeze into microscopic spheres, creating the characteristic matte, porous texture we call velvet.
A surface that is merely chilled or not frozen solid will be too warm. The chocolate droplets will have time to spread and cool slowly, resulting in a smooth, shiny, and often uneven shell—the exact opposite of the desired effect. The -18°C standard is critical because it ensures a precise thermal shock of over 60°C, which is the force needed to trigger this instant crystallization. This temperature differential is non-negotiable.
This process is a beautiful dance between temperature and physics. The frozen entremet acts as a cold canvas, capturing each tiny particle of the chocolate spray exactly where it lands, building up the texture layer by layer.
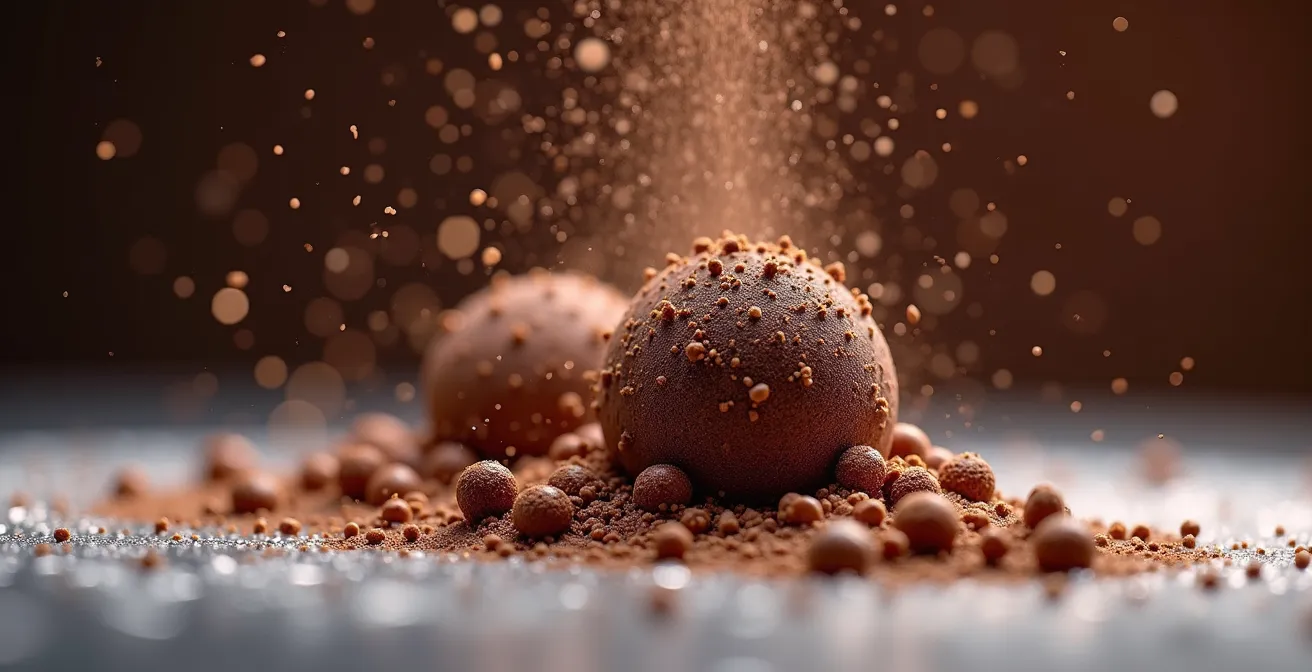
As you can see, each droplet contributes to a complex micro-structure. Understanding this allows you to troubleshoot issues. If your texture is too greasy or shiny, it’s almost always because your cake wasn’t cold enough, or your spray was too cool, narrowing that critical temperature gap.
Low pressure or compressor: which equipment for a fine and regular grain?
The spray gun is not just a tool; it’s your brush. The choice of equipment directly dictates the quality and fineness of your particle atomization, and therefore, the elegance of your final texture. While any food-safe sprayer can work, they are not created equal. The key variables to consider are pressure (PSI), nozzle size, and volume capacity (HVLP – High Volume, Low Pressure).
For the ambitious pastry chef, a dedicated HVLP spray gun, either with an integrated turbine (like a Wagner model) or connected to a separate air compressor, is the superior choice. These systems provide the power and, more importantly, the control needed for a consistently fine and even grain. A pressure of at least 50 PSI is ideal for breaking the chocolate mixture into the finest possible mist. Hobbyist airbrushes, while great for detailed coloring, often lack the power and have nozzles too small (0.3-0.5mm), making them prone to clogging with chocolate.
Investing in professional-grade equipment means you can use larger nozzles (1.5mm and up), which are less likely to clog and can handle slightly thicker mixtures, giving you more creative flexibility. The table below breaks down the options to help you choose the right tool for your production level and aesthetic goals.
As this comparative analysis from professional forums shows, the investment in better equipment pays off in consistency and control.
| Equipment Type | Cost Range | Pressure Control | Nozzle Size | Best For | Cleaning Difficulty |
|---|---|---|---|---|---|
| Hobbyist Airbrush | $50-150 | Limited (20-40 PSI) | 0.3-0.5mm | Detail work, small items | High – clogs easily |
| Wagner HVLP | $100-300 | Adjustable turbine | 1.3-2.5mm | Medium production | Medium |
| Professional HVLP + Compressor | $500-1500 | Full control (50+ PSI) | 1.5-3.0mm | High volume production | Low – larger components |
| Dedicated Chocolate Sprayer (Krebs) | $800-2000 | Heated, consistent | 2.0-2.5mm | Professional kitchens | Low – food-safe design |
The thickness error that cracks your velvet shell on thawing
One of the most heartbreaking moments in patisserie is seeing a perfect velvet finish develop unsightly cracks as the entremet thaws. This is almost always caused by a single, common error: applying the velvet layer too thickly. The velvet shell, being pure chocolate and cocoa butter, is rigid when frozen. The mousse and creamy layers inside, however, expand slightly as they rise from -18°C to serving temperature. If the velvet shell is too thick and brittle, it cannot accommodate this subtle expansion and inevitably cracks under the pressure.
The solution is a matter of technique, not recipe. The goal is to build up a micro-thin, flexible skin, not a heavy armor. This is achieved by maintaining an optimal spray temperature of 45°C to 50°C and following a strict application protocol. A warmer spray atomizes better, creating finer particles that build a more delicate layer. Forget about trying to get full coverage in one pass. True professional technique is about patience and precision.
To achieve that flawless, crack-free finish, you must adopt a painter’s mindset. Swift, continuous passes are key to avoiding buildup in any single spot. Here are the professional steps to ensure optimal thickness:
- Maintain distance: Hold the spray gun a consistent 30-40 cm (11-15 inches) from the cake’s surface.
- Use swift, continuous passes: Your arm should always be in motion. Never linger in one spot, as this is how thick patches are created.
- Apply multiple thin coats: It is far better to apply 2-3 whisper-thin layers, with a brief moment in the freezer between each, than one thick coat.
- Test your spray pattern first: Always do a test spray on a piece of cardboard to check your flow and pattern before turning to the actual cake.
- Watch for translucency: A correctly applied thin layer will appear slightly translucent immediately after spraying, before it fully opacifies from the cold. This is a sign of perfect thickness.
Paint booth or cardboard: how to spray without repainting the whole kitchen?
The fine mist that creates a beautiful velvet texture on your cake will do the same on your countertops, walls, and floor if not properly contained. Creating a controlled micro-environment is not just about cleanliness; it’s about professionalism and efficiency. A dedicated spray space allows for better visibility, easy rotation of the cake, and even the potential to recover excess chocolate spray.
While professional kitchens may have dedicated ventilated spray booths, you can create a highly effective DIY station with a few simple items. The goal is to build an enclosure that is large enough to work in, easy to clean, and allows for good lighting. A large, clear plastic storage container turned on its side is a popular and brilliant solution used by many professionals. It’s reusable, contains the overspray, and its transparency allows light to pass through for maximum visibility.
Setting up your station correctly from the start transforms spraying from a messy chore into a clean, repeatable process. A high-quality turntable is essential for achieving a smooth, even coat without having to move the spray gun around the cake.

Here’s a professional checklist for setting up your spray station:
- Use a large, clear plastic storage container turned on its side to act as your three-walled booth.
- Line the inside with food-safe plastic wrap. This makes cleanup instantaneous and allows you to scrape off and recover the overspray.
- Place a high-quality, heavy-duty turntable with a non-slip mat inside. This ensures smooth, steady rotation.
- Set up your station in an area that is easy to clean, such as a tiled bathroom or even inside a large, clean dishwasher for easy hosing down.
- Always wear protective equipment, including a mask and gloves, to avoid inhaling the atomized fat particles.
How to read the drop system on the packages to never mistake the use?
Moving beyond the 50/50 rule means learning to speak the language of professional chocolate: the fluidity drop system. Reputable chocolate manufacturers like Callebaut use a simple 1-to-5 drop rating on their packaging to indicate the viscosity of the chocolate. This number tells you how much cocoa butter is naturally in the chocolate, and therefore how fluid it will be when melted. Understanding this is the key to creating a perfect, repeatable velvet spray mix every single time, regardless of the chocolate you choose.
This system empowers you to adjust your cocoa butter additions with precision. A chocolate with higher fluidity (more drops) will require less added cocoa butter to reach the ideal spraying consistency, saving you money and giving you a more intensely chocolate-flavored finish. A lower fluidity chocolate will need more help. This knowledge allows you to customize your recipe for a specific outcome, rather than relying on a one-size-fits-all ratio.
Case Study: Professional Chocolate Selection for Spray Applications
A tutorial by Design & Realisation, documented by specialist supplier DR.ca, showcases this principle perfectly. They emphasize using a classic chocolate with a three-drop fluidity rating, mixed at the professional 60% chocolate to 40% cocoa butter ratio. Their tests confirmed this combination creates the optimal viscosity for a consistent, fine velvet texture on both pastries and complex hollow figures, demonstrating the direct link between product selection and final aesthetic.
Here is a practical guide to using the drop system for your velvet spray:
- 3-Drop Fluidity: This is the ideal standard. It works perfectly with the 60/40 chocolate-to-cocoa-butter mix, passing through the spray gun with ease.
- 4-Drop Fluidity: This chocolate is more fluid, so you can use slightly less cocoa butter. Start with a 65/35 ratio and adjust as needed.
- 5-Drop Fluidity: Very fluid. This may only need a 70/30 ratio or even less added cocoa butter. It’s excellent for an intensely flavored, dark chocolate finish.
- 1-2 Drop Fluidity: These are generally too thick and best avoided for spraying. Even with a large amount of cocoa butter, they struggle to atomize correctly.
How to infuse matcha tea or herbs into white chocolate without altering the texture?
A plain velvet finish is elegant, but a flavored and colored one is a signature. Infusing flavors like matcha, raspberry, or even savory herbs into your spray mixture opens up a world of creative possibilities. However, the process is delicate. The primary challenge is introducing a new ingredient without compromising the texture or, worse, clogging your spray gun. Water is the absolute enemy here, and so are any solid particles.
The secret is to use only fat-soluble ingredients and to infuse them into the cocoa butter *before* it’s mixed with the chocolate. This ensures that the flavor is evenly distributed and that any potential solids are strained out. For powders like matcha or freeze-dried fruit, you must use micronized versions, which are ground so finely they will pass through the nozzle without issue. For whole ingredients like herbs, spices, or coffee beans, a gentle, heated fat-infusion is the correct method.
This point on coloring is so critical that it warrants a direct warning. As the Bakels Philippines Technical Team states in their professional guide:
Always use fat-soluble coloring if you are creating a colored cocoa butter mixture
– Bakels Philippines Technical Team, Bakels Professional Chocolate Guide
Water-based gels or liquids will cause the chocolate to seize instantly, ruining your batch and your spray gun. Below is a professional action plan for perfectly infusing your velvet spray.
Action Plan: The Fat-Infusion Method for Flawored Sprays
- Heat your cocoa butter gently to around 50°C and add your whole spices or herbs (e.g., vanilla beans, rosemary sprigs). Let it infuse off the heat for at least 30 minutes to extract the aromatic oils.
- Strain the infused cocoa butter through a super-fine sieve or a piece of cheesecloth to remove every last particle. This step is non-negotiable.
- For powders (like micronized matcha or fruit powders) or fat-soluble colorings, add them to the warm, strained cocoa butter.
- Use an immersion blender to fully incorporate the powder or color into the cocoa butter, ensuring there are no clumps.
- As a final safety measure, strain the colored/flavored cocoa butter one more time before mixing it with your melted chocolate to create the final spray mixture.
Key takeaways
- The 50/50 ratio is a starting point, not a rule. Professional results come from matching your cocoa butter addition to your chocolate’s specific fluidity (drop system).
- The velvet texture is a product of extreme thermal shock. A -18°C dessert surface and a 45-50°C spray are non-negotiable for the required micro-crystallization.
- Cracking is a sign of a thick application. Master the art of multiple, swift, whisper-thin layers to create a flexible, durable finish.
How to Layer Mousse, Creamy, and Crunch Without Collapsing the Cake?
You can have the most advanced spray gun and the perfect chocolate-to-cocoa-butter ratio, but if your canvas is flawed, your masterpiece will crumble. The velvet finish is an unforgiving truth-teller; it highlights every surface imperfection and is only as strong as the cake beneath it. The structural integrity of your entremet is the silent, invisible foundation of a successful velvet spray.
A poorly constructed entremet, with layers that aren’t properly set or frozen, will shift, sag, or bulge during the spraying and defrosting process. This movement is a primary cause of cracking in the velvet shell. Each internal component—the crunchy croustillant, the smooth crémeux, the airy mousse—must be a solid, stable block, fused together by the freezing process. This creates a single, unified structure that can withstand the temperature changes and handling.
Case Study: Structural Integrity’s Impact on Finish Quality
Callebaut’s professional training programs consistently emphasize that the velvet spray technique magnifies surface flaws. Their case studies demonstrate that entremets built with properly frozen individual layers (a minimum of 3 hours at -18°C for the assembled cake) maintain their shape perfectly during spraying and defrosting. This prevents the micro-fissures and large cracks that commonly plague poorly constructed cakes, proving that the final beauty is determined by the unseen internal architecture.
Achieving this level of stability requires a disciplined, layer-by-layer freezing protocol. Rushing this stage is a false economy that will only lead to failure at the final step. Follow this professional freezing protocol for guaranteed success:
- Freeze the croustillant base: After pressing your crunchy layer into the mold, freeze it for at least 30 minutes until it is completely solid. This creates a stable platform.
- Add and freeze the mousse: Pour in your first mousse layer and freeze for a minimum of 2 hours before adding the next component.
- Insert the frozen center: Your creamy insert should be frozen solid before being pressed gently into the semi-frozen mousse layer for perfect adhesion without smearing.
- Final layer and deep freeze: Add the final mousse layer, smooth the top perfectly, and freeze the entire assembled cake for at least 3 hours, or ideally overnight.
- Final chill before spraying: Ensure the cake is at a deep-frozen -18°C for the final hour right before you intend to spray.
Stop following recipes and start designing textures. You now have the principles to move beyond the basics and control every aspect of the velvet finish, from its texture and color to its structural durability. Take this knowledge, load your spray gun, and begin sculpting your signature finish today.