The secret to unforgettable homemade truffles isn’t a perfect ratio, but mastering the confectioner’s touch for a perfectly imperfect result.
- Temperature control is more critical than the recipe itself; it governs the ganache’s texture, stability, and final finish.
- The final coating is not just for decoration, but a professional tool to correct imperfections and add sensory layers of texture and flavour.
Recommendation: Focus on the process and sensory details, not just the ingredients, to elevate your truffles from simple sweets to a memorable, handmade gift.
There is a special kind of joy in giving a gift you’ve made with your own hands. Among the most cherished of these are chocolate truffles. Many recipes will tell you it’s all about a simple two-to-one ratio of chocolate to cream, aiming for perfectly round, identical spheres. This can lead to a lot of frustration when things don’t turn out like the flawless pictures. We often get so caught up in the rules that we miss the entire point of a handmade treat.
But what if the real magic isn’t in machine-like perfection? What if the true art lies in embracing what I call “generous imperfection”? As a confectioner, I can tell you that the most memorable truffles carry the signature of their maker. They aren’t about just chocolate and cream; they’re about the subtle infusion of mint, the satisfying crunch of a nutty coating, and the knowledge of how to rescue a ganache that seems destined for the bin. The beauty is in the craft itself.
This guide isn’t about chasing an impossible standard. It’s about giving you the confectioner’s touch. We’ll explore the science of the perfect ganache emulsion, understand why temperature is your most important tool, and master the little details that transform simple ingredients into a personal, generous, and truly gourmet gift. We will walk through the common pitfalls and learn how to turn them into triumphs, creating truffles that are uniquely and deliciously yours.
In the sections that follow, we will break down the key moments in the truffle-making process. From infusing flavours to the final, delicate coating, you’ll gain the confidence to create with joy and purpose.
Summary: A Confectioner’s Guide to Hand-Rolled Truffles
- Earl Grey Tea or Fresh Mint: How to Cold Infuse to Preserve Subtle Aromas
- Cocoa Powder or Chopped Nuts: Which Finish Best Masks Imperfections?
- Oil Separating Out: How to Re-Emulsify a Greasy Ganache with a Little Milk
- The Mistake of Storing Without an Airtight Container That Gives an Onion Taste to Your Truffles
- Caramel Shards or Fleur de Sel: When to Add Them So They Don’t Melt
- The Mistake of Adding Cold Liquid That Instantly Breaks Your Emulsion
- Raw Powder or Dark Square: Which Form Brings the Most Flavanols for the Heart?
- How to Enrobe Bonbons Manually Without Leaving Thick Feet
Earl Grey Tea or Fresh Mint: How to Cold Infuse to Preserve Subtle Aromas
The first step in making your truffles truly your own is flavour. While extracts have their place, nothing compares to the deep, authentic taste of real ingredients. Infusing your cream with something like the bergamot from Earl Grey tea or the cool notes of fresh mint leaves is where the artistry begins. However, the biggest mistake is to boil the cream with the botanicals, which can scald the delicate flavours and leave a bitter aftertaste. The secret is a gentle touch.
A cold infusion is the confectioner’s method for drawing out pure flavour without cooking it away. You simply heat the cream until it’s just about to simmer—you’ll see tiny bubbles forming around the edge of the pan. Immediately remove it from the heat and add your tea or fresh mint. By covering the pot and letting it steep away from the heat for 10 to 15 minutes, you allow the cream to become deeply fragrant while preserving the subtle, volatile oils that make these flavours so special.
After steeping, it’s crucial to strain the cream thoroughly to remove all solids before gently reheating it to the correct temperature for making your ganache. This step ensures a silky-smooth final texture. This gentle process is a perfect example of the confectioner’s touch—a small adjustment in technique that yields a dramatically more elegant and refined result, turning a simple truffle into a layered sensory experience.
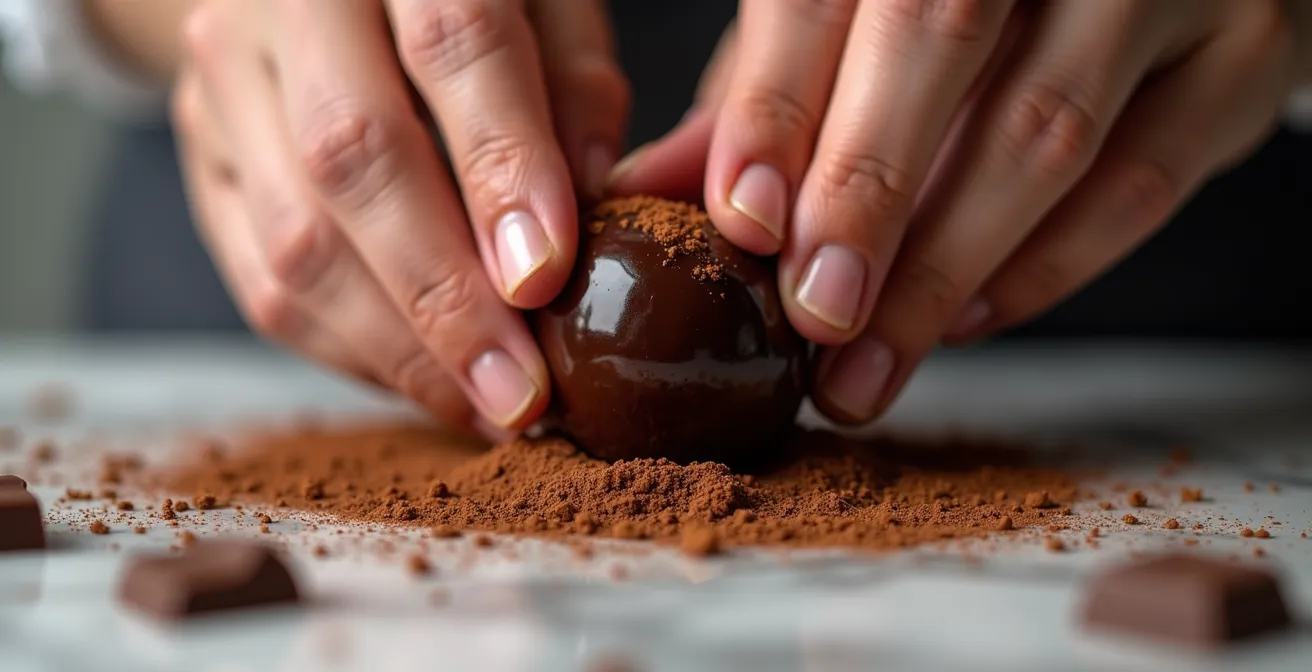
Cocoa Powder or Chopped Nuts: Which Finish Best Masks Imperfections?
Let’s be clear: hand-rolled truffles are supposed to look handmade. Those little bumps and slightly uneven shapes are not flaws; they are the marks of authenticity and care. Instead of trying to hide them, we should choose a finish that celebrates this “generous imperfection.” The coating is your final flourish, a chance to add a layer of texture and flavour that complements the rich ganache within. While a simple dusting of cocoa powder is classic, other coatings can be more forgiving and add wonderful character.
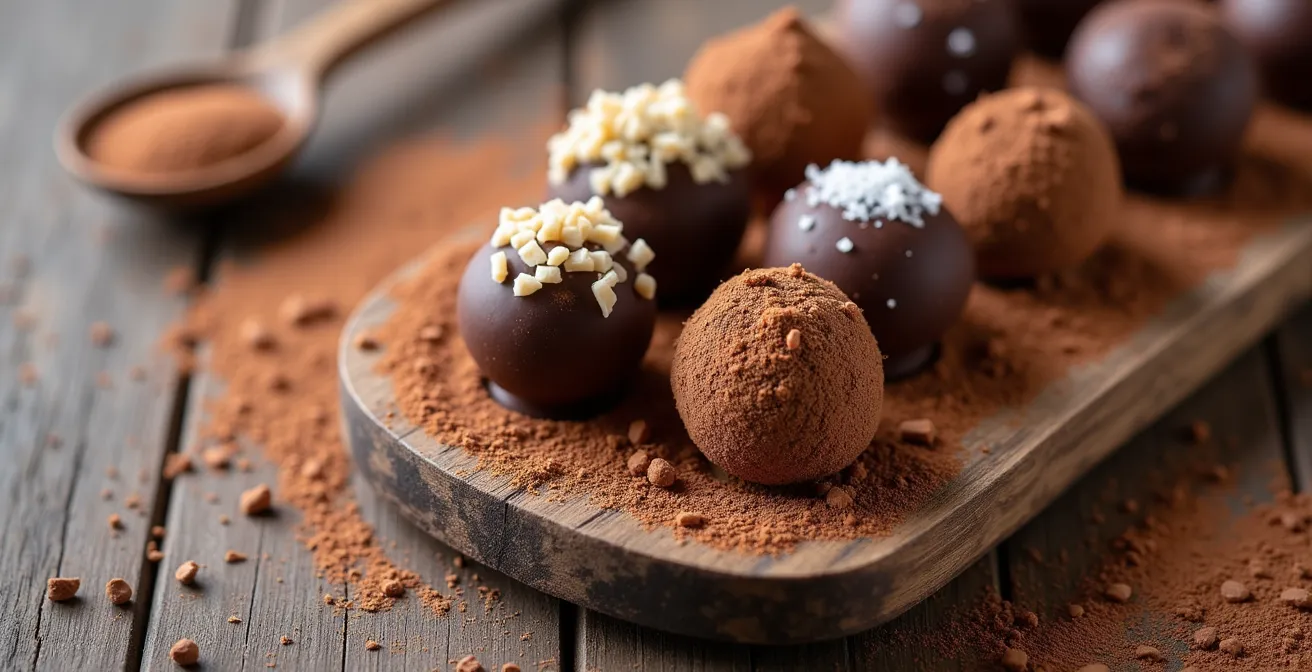
Finely chopped nuts, toasted coconut, or even chocolate shavings have a varied, rustic texture that naturally works with the irregular shape of a hand-rolled truffle. They add a delightful crunch and visual appeal that a perfectly smooth surface lacks. A professional technique for ensuring any coating adheres perfectly is the double-coating method, a secret that elevates homemade truffles to a professional standard.
First dusting in cocoa powder to absorb surface oils, followed by a second roll in chopped nuts or shavings, which will now adhere much better.
– The Kitchn
This technique turns the initial cocoa powder dusting into a functional primer, creating a slightly tacky surface for the chunkier coating to grab onto. It’s a brilliant example of how a finish isn’t just decorative but can also improve the structural integrity and overall eating experience of your truffle.
Oil Separating Out: How to Re-Emulsify a Greasy Ganache with a Little Milk
It’s the moment every home confectioner dreads: you’re stirring your beautiful melted chocolate and cream, and suddenly it turns into a greasy, separated mess. This is called a “broken” ganache, and it happens when the emulsion of fat (from the cocoa butter and cream) and water (from the cream) fails. The most common causes are temperature shock or an incorrect ratio of fat to liquid. But do not throw it away! A broken ganache is almost always salvageable with a little patience and understanding of emulsion science.
When you see oil pooling on the surface, your first instinct might be to whisk it furiously. This often makes it worse. The key is to gently coax the cocoa solids and fat back together. The simplest way to do this is by adding a very small amount of cold liquid—full-fat milk or a bit more cream works best—to the mixture. Add just a teaspoon at a time and stir slowly and deliberately from the center of the bowl outwards. You will begin to see the ganache magically pull itself back together into a smooth, glossy state. For a professional touch, some chocolatiers recommend adding softened butter when the ganache reaches 98-102°F (37-39°C) to help stabilize the re-formed emulsion.
If manual stirring doesn’t work, an immersion blender on its lowest setting can force the emulsion back together. Rescuing a ganache is a true confectioner’s skill, turning a potential disaster into a silky-smooth success.
Your Action Plan: Emergency Ganache Rescue
- Diagnose the Break: Is it grainy (usually from temperature shock) or oily (often a ratio or stirring issue)?
- Add Cold Liquid: Add 1/2 teaspoon of cold cream or full-fat milk at a time to help pull the cocoa solids back into the emulsion.
- Stir Gently: Use a spatula to stir slowly in a circular motion, starting from the center and working your way out. Avoid vigorous whisking.
- Use a Blender (If Needed): If manual stirring fails, use an immersion blender on its lowest setting for a few seconds to force re-emulsification.
- Adjust as a Last Resort: If the ganache is too liquid, add a small amount of melted chocolate. If it’s too stiff, add a touch more warm cream.
The Mistake of Storing Without an Airtight Container That Gives an Onion Taste to Your Truffles
You’ve spent hours crafting the most beautiful, flavourful truffles. You place them in the refrigerator to set, only to discover the next day that they have a faint, unmistakable taste of last night’s leftover onions or garlic. This is a heartbreaking and entirely avoidable tragedy. Chocolate, with its high fat content from cocoa butter, is incredibly porous and acts like a sponge for strong odours. Storing truffles improperly is one of the fastest ways to ruin your hard work.
Simply placing them on a plate, even if covered with plastic wrap, is not enough. Professionals use a double-barrier method to ensure absolute protection. First, the truffles are carefully arranged in a single layer, then the entire container or plate is tightly wrapped in plastic. Second, this wrapped package is placed inside a completely airtight container. This creates two layers of defense against any ambient smells lurking in your refrigerator.
Furthermore, temperature is key to preservation. While the refrigerator seems like the obvious choice, it can be too cold and humid. According to professional chocolatiers, the ideal temperature to store chocolate is 59-68°F (15-20°C), which is closer to a cool cellar or pantry. If you must use the fridge, the double-barrier method is non-negotiable. Stored this way, your truffles will not only be safe from unwanted flavours but will also maintain their perfect texture for a week or even longer, ensuring your gift is as delicious as the day you made it.
Caramel Shards or Fleur de Sel: When to Add Them So They Don’t Melt
Adding a crunchy, crystalline topping like fleur de sel or shiny caramel shards can elevate a truffle from simply delicious to truly spectacular. It introduces a third sensory layer: a sharp, satisfying crunch that gives way to the smooth, melting ganache. However, these additions are delicate. Both salt and sugar are hygroscopic, meaning they attract moisture from the air and from the ganache itself. Add them too early, and you’ll be left with a weepy, dissolved mess instead of a crisp topping.
The secret is all in the timing. You must wait until the truffle’s final coating is no longer wet but is still slightly tacky. If you are dipping your truffles in a final layer of tempered chocolate, this window is brief. You should add the topping immediately after dipping, as the chocolate begins to set. The tacky surface will act as a glue, holding the salt crystals or caramel pieces in place without dissolving them. Once the topping is applied, chill the truffles immediately to lock everything in place and stop the moisture from migrating.
If you’re mixing crunchy elements into the ganache itself, there’s another trick: coat the pieces (like caramel bits or crispy rice) in a very thin layer of melted cocoa butter first. This creates a fat-based barrier that protects them from the moisture in the cream, preserving their crunch. These are the small, thoughtful details that show a true confectioner’s touch.
The Mistake of Adding Cold Liquid That Instantly Breaks Your Emulsion
You’ve made a perfect, glossy ganache. Now you want to add a splash of cold liqueur, like Grand Marnier or amaretto, for an extra layer of flavour. You pour it in, give it a stir, and watch in horror as your silky mixture seizes into a grainy, oily catastrophe. This is another classic case of a broken emulsion, caused by thermal shock. The drastic temperature difference between the warm, fatty ganache and the cold liquid causes the cocoa butter to solidify instantly, forcing it out of the delicate emulsion you worked so hard to create.
To avoid this, professionals follow a simple but crucial guideline. As a rule, any liquids you add to your ganache should never be more than a 10-15°C (18-27°F) maximum difference in temperature from the ganache itself. This small buffer is enough to prevent the fats from seizing. But how do you add a cold liquid without breaking this rule? The answer is to temper the addition.
Instead of pouring the cold liquid directly into the main batch, take a small amount of the warm ganache (a few tablespoons) and whisk it into the cold liquid in a separate bowl. This will create a small, intermediate mixture that is closer in temperature to your main batch. Once this small mixture is smooth, you can slowly stir it back into the rest of the ganache without any risk of thermal shock. It’s a simple, extra step that guarantees a smooth, perfectly flavoured result every time.
Key Takeaways
- The success of a ganache lies in creating a stable emulsion, which depends more on temperature control than on a rigid recipe.
- Embrace the “generous imperfection” of handmade truffles; coatings should be used to add texture and flavour, not just to hide supposed flaws.
- Proper storage is non-negotiable. An airtight, double-barrier method is essential to protect the delicate flavour of your truffles from outside odours.
Raw Powder or Dark Square: Which Form Brings the Most Flavanols for the Heart?
The advice to “use good quality chocolate” is common, but what does it really mean for your truffles? Beyond taste, the choice of chocolate impacts the ganache’s structure and even offers some wholesome benefits. Dark chocolate is rich in flavanols, powerful antioxidants linked to heart health. When choosing your chocolate, the form—be it a raw powder or a solid bar—and its cocoa percentage matter greatly.
Generally, the less processed the chocolate, the more flavanols it retains. Natural cocoa powder (not Dutch-processed) is less alkalized and thus holds onto more of these beneficial compounds. However, its higher acidity can affect the texture of your ganache. In contrast, solid dark chocolate, especially bars with a 60-72% cocoa content, is optimal for creating a robust ganache with a deep flavour and a good dose of flavanols. This percentage provides the perfect balance: enough cocoa solids for structure and flavour, but not so much that the ganache becomes brittle or bitter.
It’s also worth noting the difference between cocoa powders. Dutch-processed cocoa powder is treated with an alkali to neutralize its acidity, resulting in a darker colour and milder flavour. While this creates a beautiful deep brown truffle, the process reduces its flavanol content. For a richer, more complex flavour and more of those heart-healthy compounds, choosing a high-quality natural cocoa powder or a dark chocolate bar in the 60-72% range is the superior confectioner’s choice.
How to Enrobe Bonbons Manually Without Leaving Thick Feet
The final step for many truffles is a delicate outer shell of tempered chocolate. When done by hand, a common giveaway of an amateur job is the “thick foot”—a pool of chocolate that hardens at the base of the truffle. This happens when excess chocolate drips down and collects on the parchment paper. While it doesn’t ruin the taste, avoiding it is a mark of refined technique and gives your truffles a much more professional appearance.
The primary secret to preventing thick feet is temperature control. Specifically, the temperature of your truffle centers before dipping is critical. Professional chocolatiers reveal that the key is to maintain the chilled ganache centers at around 68°F (20°C). If the centers are too cold, they will cause the tempered chocolate to set too quickly, grabbing onto a thick layer that is more likely to drip and pool. If they are too warm, they might melt into the coating.
Another factor is the viscosity of your tempered chocolate. If it’s too thick, it will naturally cling more heavily to the truffle. You can adjust this in several ways, such as by controlling the temperature or adding a small amount of cocoa butter. After dipping, gently tap the dipping fork on the side of the bowl two or three times to shake off any excess before placing the truffle on parchment paper. This simple “three taps method” is often all it takes to prevent a foot from forming.
| Method | Amount | Effect | Best For |
|---|---|---|---|
| Add Cocoa Butter | 1-5% of total weight | Thins coating, improves flow | Professional finish |
| Add Coconut Oil | 1 tsp per cup chocolate | Helps hardening, adds shine | Home bakers |
| Temperature Control | 86-88°F working temp | Maintains fluidity | Tempered chocolate |
| Three Taps Method | 3 firm taps on bowl edge | Removes excess coating | Manual dipping |
Now you have the confectioner’s secrets not just to make truffles, but to craft them with intention and joy. Embrace the process, don’t fear the imperfections, and start your first batch today to share a truly special, handmade gift.