The difference between an amateur and a professional chocolate tart lies not in the ingredients, but in the precise control of temperature and physics at every stage.
- The pastry’s crispness depends on preventing gluten development and shrinkage through controlled chilling and baking.
- A true mirror glaze is a stable emulsion achieved through high-shear friction, not just by melting chocolate.
- The final cut’s perfection is a result of thermal management, using a heated blade to slice, not break, the set ganache.
Recommendation: Master these physical principles to move from simply following a recipe to engineering a consistently flawless result.
For the perfectionist pâtissier, there is no greater disappointment than a chocolate tart that falls short of aesthetic excellence. You select the finest couverture, you craft a delicate pâte sucrée, yet the final product is marred by a dull surface, unsightly air bubbles, or a cracked cross-section upon serving. It’s a common frustration that can undermine hours of meticulous work, leaving you with a creation that tastes divine but lacks the visual precision of a high-end patisserie.
Conventional wisdom offers simple advice: use good chocolate, let it cool. But this guidance barely scratches the surface. It fails to address the underlying science that governs the final texture and appearance. The truth is that a flawless finish is not a matter of luck or secret ingredients; it is a matter of physics. The journey from a grainy, unstable mixture to a silken, reflective surface is one of controlled crystallization, thermal management, and structural integrity.
This guide moves beyond the recipe to reveal the critical control points that separate an acceptable tart from an exceptional one. We will deconstruct the process, focusing on the scientific principles behind each step. From waterproofing the shell to mastering the ganache emulsion and executing the perfect slice, you will learn to manipulate the physical properties of your ingredients to achieve predictable, professional results every single time. It’s time to stop hoping for perfection and start engineering it.
To guide you through this technical mastery, this article breaks down the essential techniques into a series of focused sections. Each part addresses a specific challenge in achieving a flawless chocolate tart, providing the scientific reasoning and actionable steps needed for success.
Table of Contents: A Breakdown of Tart Perfection
- Why is brushing your pastry with egg yolk mandatory before pouring the ganache?
- How does the ‘tapping’ technique eliminate surface imperfections?
- Ganache set in the fridge vs. baked custard filling: which texture for which client?
- The storage mistake that dulls your tart’s shine
- Service problem: why heating the blade is the secret to perfect slices?
- Right angle problem: how to get perfect 90-degree edges?
- How to create an elastic and shiny core using the technique of the friction?
- How to succeed with a crumbly shortcrust pastry that doesn’t shrink during baking?
Why is brushing your pastry with egg yolk mandatory before pouring the ganache?
The success of a truly exceptional tart lies in its contrast of textures: the crisp, friable shell against the rich, melting ganache. This critical distinction can be completely lost if moisture from the filling is allowed to migrate into the pastry, turning it soft and soggy. The mandatory step of brushing the baked shell with egg yolk—a technique known as ‘dorure’—is not for color, but for science. It is a professional waterproofing measure.
When the thin layer of egg yolk is applied to the warm, blind-baked shell and returned to the oven for a few minutes, its proteins coagulate and form a cohesive, impermeable film. This food-safe lacquer seals the porous surface of the pâte sucrée, creating a robust barrier that prevents the ganache’s water and fat content from penetrating the crust. This ensures the pastry remains perfectly crisp and sandy for hours, even days, after filling.
Furthermore, this sealed environment is crucial for the ganache itself. By preventing moisture loss into the crust, the ganache can undergo a slow, even crystallization process at room temperature. Allowing the tart to rest for a few hours before refrigeration is key. This slow set allows the cocoa butter and cream to form a stable, silky emulsion, resulting in the desired fondant texture and superior flavor expression. Skipping the waterproofing step compromises both the crust’s integrity and the ganache’s final quality.
How does the ‘tapping’ technique eliminate surface imperfections?
A mirror-like surface on a ganache is the hallmark of a professional. Yet, this pristine finish is often ruined by the appearance of tiny air bubbles. These imperfections are not a sign of poor ingredients but of trapped air introduced during the mixing process. While it’s impossible to avoid them completely, mastering de-bubbling techniques is essential for a flawless result. The simplest and most effective of these is the ‘tapping’ method.
The physics behind this technique is straightforward. By firmly tapping the base of the tart tin on a countertop, you introduce vibrations into the viscous ganache. This energy helps to dislodge air bubbles clinging to the bottom and sides of the shell and encourages them to rise to the surface, governed by their lower density compared to the chocolate. Once they have surfaced, they can be easily smoothed over with a small offset spatula.
For a truly perfect finish, professionals employ a more advanced method. After tapping, you can use a small kitchen blowtorch, like one used for crème brûlée. By running the flame quickly and evenly about three inches above the ganache, you apply a burst of intense heat. This heat instantly collapses the surface tension of any remaining bubbles, eliminating them completely and leaving behind an exceptionally shiny, unblemished surface. However, care must be taken; the goal is to pop the bubbles, not to cook the ganache. Gentle, steady stirring during preparation will also minimize the initial amount of air incorporated.
Ganache set in the fridge vs. baked custard filling: which texture for which client?
The term “chocolate tart” can describe two fundamentally different creations, each with a unique texture, flavor profile, and ideal client. The choice between a no-bake set ganache and a baked custard-style filling is a strategic one, dictated by the desired sensory experience. A set ganache is an expression of pure chocolate, while a baked filling offers a more complex, nuanced dessert.
For this recipe you should absolutely use dark chocolate. That can be anywhere from 55-75% cocoa solids. My preference is for 70% because I prefer the intensity and also the quality that comes with darker chocolate, but if you have a sweeter palate, then choose something around the 60% mark.
– Professional Pastry Expert, Scientifically Sweet
A set ganache relies on the crystallization of cocoa butter for its structure. It produces a dense, silky, fondant-like texture that melts luxuriously in the mouth. Its flavor is a direct and intense reflection of the couverture used. This style is perfect for the chocolate purist who seeks an unadulterated, powerful chocolate experience and a visually stunning, mirror-like gloss. In contrast, a baked custard filling incorporates eggs, which are gently cooked in the oven. The eggs act as a setting agent, creating a texture that is lighter, silkier, and slightly wobbly, similar to a pot de crème. The baking process introduces subtle cooked notes through the Maillard reaction, adding layers of complexity to the flavor. This version appeals to a palate that enjoys richness balanced with a softer texture and a more intricate flavor profile. The following table breaks down the key distinctions:
| Criteria | Set Ganache (No-Bake) | Baked Custard Filling | Best For |
|---|---|---|---|
| Final Texture | Silky fondant, melts in mouth | Since this is essentially a chocolate custard, the eggs require gentle cooking and the filling will continue to set as it cools to a nice silky consistency. | Restaurant plating |
| Shine Level | Mirror-like glossy finish | Satin matte finish | Photography/display |
| Cut-ability | Firm & clean when chilled | This tart is baked when the edges look set with a few bubbles maybe at thesurface but the center should have a slight jiggle — not watery. Bake until the edges begin to bubble slightly but the center is still just slightly wobbly. | Catering service |
| Flavor Profile | Pure chocolate expression | Complex, cooked notes from Maillard reaction | Sophisticated palates |
| Shelf Stability | 2-3 days refrigerated | 4-5 days refrigerated | Make-ahead events |
The storage mistake that dulls your tart’s shine
After achieving a perfect, glossy surface on your ganache, the final challenge is to preserve it. The most common mistake that turns a brilliant shine into a dull, hazy, or streaky finish is improper storage. This phenomenon, known as “bloom,” is not spoilage but a physical transformation of the chocolate’s structure caused by adverse environmental conditions, primarily temperature fluctuations and humidity.
There are two types of bloom. Fat bloom, which appears as a greasy white or greyish coating, occurs when the tart is exposed to warmth. This causes the cocoa butter to melt, separate from the cocoa solids, and re-solidify on the surface in an unstable crystal formation. This is why a tart left in a warm room or near a heat source will quickly lose its sheen. The ideal solution is prevention through strict temperature control. This phenomenon, known as fat bloom, is when the fat melts and separates from the cocoa solids due to poor storage.
The other enemy is sugar bloom, caused by humidity. When a tart is stored in a humid environment (like a refrigerator), condensation forms on the surface. This moisture dissolves some of the sugar in the ganache. As the water evaporates, the sugar recrystallizes into large, coarse crystals, creating a gritty, dull appearance. The number one rule in a professional setting is that finished chocolate work should never be stored in a refrigerator or freezer. The optimal environment to prevent both types of bloom is a cool, dry place. A professional chocolatier maintains proper storage at 60-68°F (15-20°C) with 50-55% humidity to preserve the chocolate’s temper and shine.
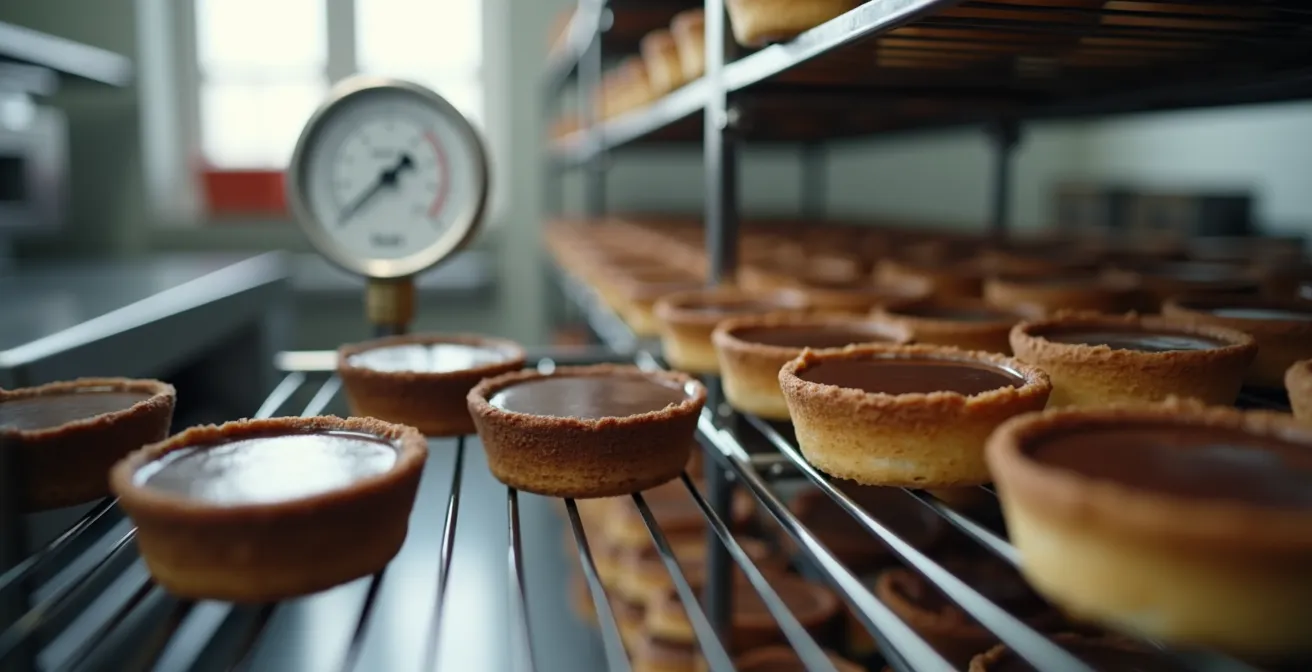
As this image of a professional storage environment illustrates, maintaining a stable climate is paramount. The use of temperature and humidity controls ensures the delicate crystal structure of the chocolate remains intact, preserving the flawless, glossy finish you worked so hard to achieve. For home pâtissiers, a cool cellar or a wine fridge set to the correct temperature range is an excellent alternative.
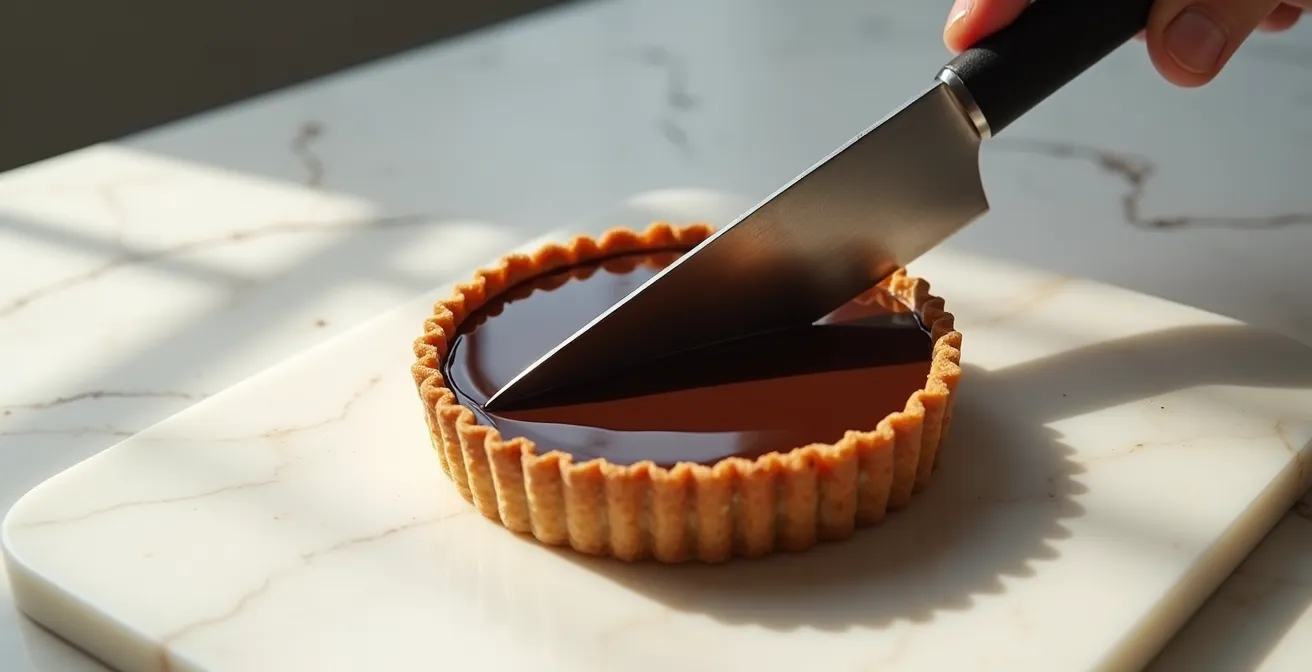
Service problem: why heating the blade is the secret to perfect slices?
The final moment of truth for any tart is the first slice. A clean, sharp cross-section that reveals the perfect layers of crust and filling is the goal, but it is often elusive. More commonly, a cold knife shatters the firm ganache, creating a jagged, messy cut that ruins the presentation. The secret to a flawless slice is not pressure, but thermodynamics: you must use a heated blade.
A chilled, set ganache is a solid, brittle structure. When a cold blade is forced through it, the pressure causes fractures to propagate ahead of the knife’s edge, resulting in cracking and crumbling. A heated blade entirely changes the physics of the interaction. By dipping the knife in hot water and wiping it dry, you transfer thermal energy to the metal. As this hot blade makes contact with the tart, it instantly melts an infinitesimally thin layer of the ganache directly in its path.
Instead of fracturing a solid, the knife is now gliding through a microscopic layer of liquid chocolate. This eliminates friction and pressure, allowing for a perfectly clean, smooth cut with no resistance. The process must be repeated for every single slice to ensure the blade remains hot enough to be effective. This is not just a tip; it is a required ritual for professional presentation.
Your Action Plan: The Professional’s Cutting Ritual
- Chill for structure: Let the tart cool fully in the fridge for at least a few hours, or overnight. This ensures the ganache is firm enough to hold its shape.
- Heat the blade: Dip a long, thin knife into very hot water for 10-15 seconds to heat the metal thoroughly.
- Wipe and cut: Remove the knife from the water and wipe it completely dry with a clean cloth. Immediately perform a single, decisive downward cut without any sawing motion.
- Clean the residue: After the cut, wipe the blade completely clean of any chocolate residue. Any leftover chocolate will mar the next slice.
- Repeat for perfection: Re-heat and re-wipe the blade before making each subsequent slice. This ensures every single piece is as perfect as the first.
Right angle problem: how to get perfect 90-degree edges?
The architectural beauty of a modern tart lies in its clean lines and geometric precision. Achieving perfectly straight, 90-degree edges is a hallmark of high-level pastry work, transforming a simple dessert into a piece of edible art. This precision is not accidental; it is the result of several techniques designed to control the structure of the pâte sucrée during and after baking.
The first step is to use a perforated tart ring rather than a traditional tart pan. The ring provides structural support during baking while the perforations allow for even heat circulation, ensuring the sides of the pastry cook and set properly. It is critical to bake the tart shell with the ring on for the majority of the cooking time. For the final 10 minutes, the ring should be removed to allow the exterior of the sides to bake fully and achieve a golden-brown color, ensuring structural stability.
Once baked, the tart shell must cool completely while still inside its metal ring. As the pastry cools, the ring acts as a mold, forcing the sides to set in a perfectly vertical position and preventing any slumping or warping. For an even higher level of precision, once the shell is completely cool and removed from the ring, a fine microplane can be gently grated across the top edge. This ‘sanding’ technique removes any slight unevenness, creating a perfectly flat, sharp surface. Finally, for the ultimate flawless finish, line the inside of the baked and cooled shell with a strip of acetate before pouring in the ganache. The acetate creates a super-smooth, non-stick barrier, resulting in a ganache wall that is glassy and perfectly flush with the pastry.
How to create an elastic and shiny core using the technique of the friction?
The coveted mirror-like shine on a ganache is not merely a result of using high-quality chocolate; it is the visible evidence of a perfectly stable emulsion. An emulsion is a suspension of one liquid within another, in this case, the fat from the cocoa butter suspended in the water from the cream. Achieving this requires more than simple stirring—it demands the application of intense physical force, a technique known as creating friction or shear.
When you simply stir chocolate and cream together, the fat globules remain relatively large and unevenly dispersed. The resulting structure is unstable and reflects light poorly, appearing dull. The key to a brilliant shine is to use an immersion blender in a tall, narrow container. This setup is crucial for creating a powerful vortex. As the blender’s blades spin, they create intense shear forces that physically rip apart the large fat globules, shattering them into microscopic droplets. This drastically increases their surface area, allowing them to be fully coated and evenly suspended within the cream.
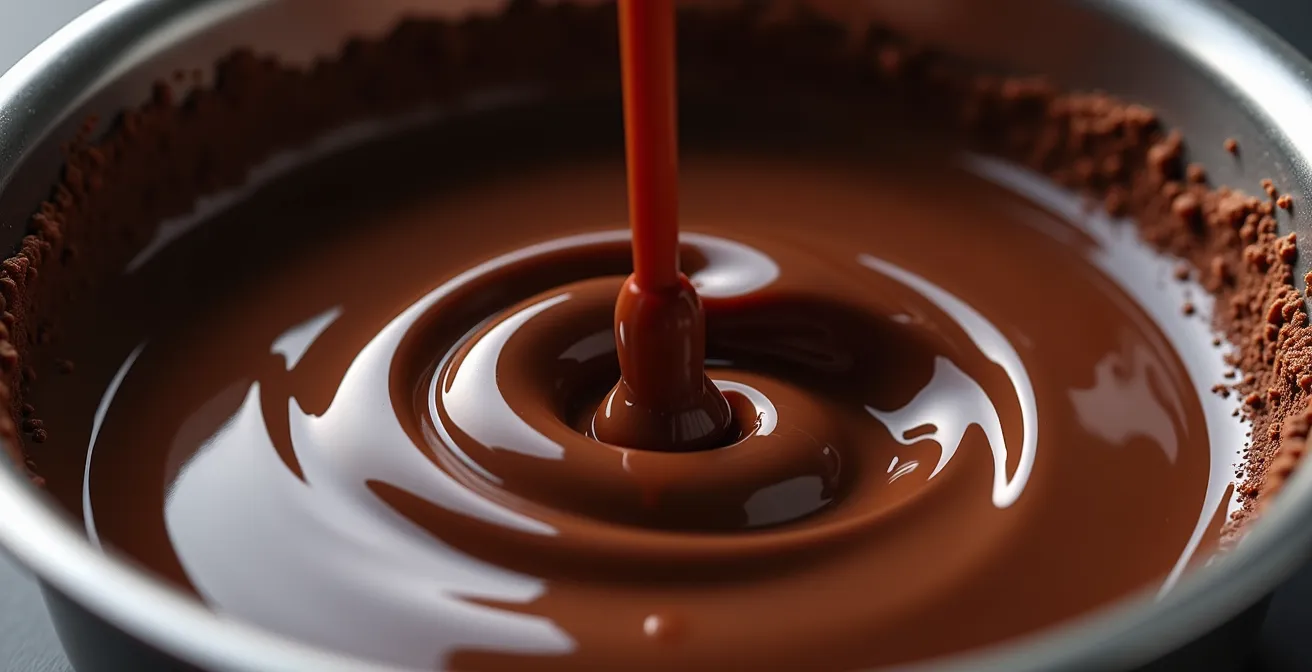
This macro-level visualization of the vortex shows the physics in action. The swirling motion ensures that the entire mixture is forced through the high-shear zone at the blades, guaranteeing a homogenous, stable, and elastic emulsion. Temperature is also critical; you must heat the chocolate mixture to exactly 45°C (113°F) to ensure the cocoa butter is fully liquid and ready for emulsification. Throughout this process, it is vital to keep the blender head submerged to avoid introducing air bubbles, as every minor imperfection will show on the final surface. The resulting structure is so fine and ordered that it reflects light like a mirror, producing the signature gloss of a professional glaze.
Key Takeaways
- A waterproofed, fully baked pastry shell is non-negotiable to preserve textural contrast.
- A mirror shine is a stable emulsion created by friction and precise temperature control, not just by melting chocolate.
- Perfect storage and serving are about managing thermal shock: avoid the fridge for storage and use a heated blade for cutting.
How to succeed with a crumbly shortcrust pastry that doesn’t shrink during baking?
The foundation of any world-class tart is the pâte sucrée. It must be crisp, sandy, and structurally sound, holding its shape perfectly without shrinking or slumping during baking. Achieving this result requires an understanding of gluten development and the behavior of butter at different temperatures. Success lies in keeping the dough cold and relaxed at every stage.
Shrinkage is primarily caused by gluten development. When flour is mixed with water and overworked, it forms long, elastic gluten strands. When heated in the oven, these strands tighten and shrink, pulling the dough inward. The first rule is minimal handling. The dough should be brought together just until it is combined. The second, and most critical, rule is thorough chilling. Chilling the dough for at least an hour after mixing allows the gluten strands to relax, drastically reducing their tendency to shrink. It also solidifies the butter, making the soft dough easier to roll out.
Even after a perfect chill, the single most effective technique to guarantee zero shrinkage is to freeze the lined tart shell solid before baking. Freezing the case for at least 30 minutes ensures the butter is rock-hard and the gluten is completely relaxed. When this frozen shell hits the hot oven, the structure sets almost instantly, long before the butter melts or the gluten has a chance to tighten. The baking process itself is also a two-stage thermal event; professionals often preheat the oven to 375°F for the initial set, then reduce the temperature to 350°F to bake the pastry through without excessive browning.
Now that you understand the science behind each component, you possess the knowledge to control the outcome. You are no longer just a baker following steps; you are an architect of texture and finish. Apply these principles of thermal management, friction, and structural integrity to every tart you create. This is how you elevate your craft from simply good to technically flawless and consistently extraordinary.