Contrary to popular belief, the secret to a perfect lava cake is not simply underbaking the batter. True mastery comes from an understanding of thermal engineering: creating a precise temperature difference between a stable, pre-made ganache core and a perfectly structured cake shell. This method removes guesswork and guarantees a decadent, molten center every single time.
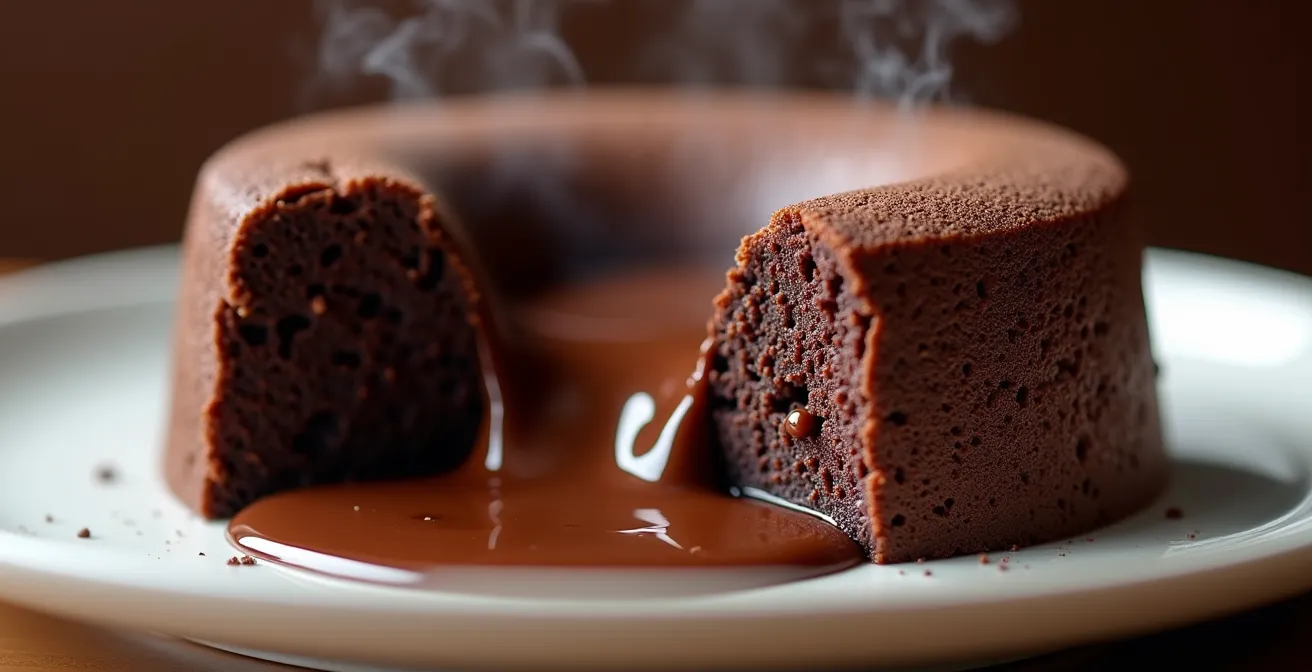
For any host, serving a chocolate lava cake is a high-stakes moment. You’re aiming for that gasp of delight as a warm, liquid chocolate heart spills onto the plate. Yet, the line between a sublime molten core and a disappointing, overcooked puck is perilously thin. Many recipes advise simply to “watch it carefully” or “pull it out when the edges are set,” turning your signature dessert into a game of chance. This often leads to inconsistent results, collapsed cakes, or a center that’s merely mushy, not truly liquid.
The common wisdom focuses on undercooking a single batter, a technique fraught with risk. But what if the fundamental approach was flawed? The key to a foolproof lava cake doesn’t lie in hoping you pull it from the oven at the exact right second. It lies in controlling two separate components with different thermal properties: a rich, stable ganache that forms the liquid core, and a delicate cake batter that bakes around it to form a firm, reliable crust.
This guide abandons culinary luck in favor of culinary science. We will deconstruct the process, focusing not on chance, but on the precise, repeatable methods that ensure success. From the choice of your baking rings to the exact resting time before serving, you will learn the “why” behind each step. This is not just a recipe; it is a system for mastering the lava cake, giving you the confidence to serve a flawless, show-stopping dessert to your guests, every time.
This comprehensive guide will explore the specific techniques and scientific principles that guarantee a perfect molten chocolate cake. The following sections break down each critical element for a flawless execution.
Summary: Mastering the Science of the Molten Lava Cake
- Why do stainless steel rings give a better crust than silicone?
- How to prepare your lava cakes 3 days in advance and bake them on demand?
- Gluten or gluten-free: which powder ensures the finest structure?
- The greasing mistake that breaks your cake when you serve it
- When to serve: why waiting 2 minutes after the oven maximizes flavor?
- Dark or milk chocolate ganache: what mandatory ratio changes for cream/chocolate are obligatory?
- The mistake of adding too much vanilla, which kills the subtlety of a Grand Cru
- Why using a high-fat ganache slows down its cooking in the oven?
Why do stainless steel rings give a better crust than silicone?
The first step towards a structurally sound lava cake is choosing the right vessel. While flexible silicone molds seem convenient, they are your enemy when it comes to creating a firm, stable crust. The reason is a simple matter of physics: thermal conductivity. Metal, particularly stainless steel, is a far superior conductor of heat than silicone. In fact, research shows that steel conducts heat approximately 18 times faster than ceramic materials, and silicone is an even poorer conductor.
This rapid heat transfer is not a minor detail; it is the key to creating the “wall” of your lava cake. When the hot steel ring makes contact with the batter, it begins to cook and set the outer layer almost instantly. This creates a firm, even crust that can contain the molten ganache center without bulging or collapsing. Silicone, by contrast, insulates the batter from the oven’s heat, resulting in slower, uneven cooking. This often leads to a weak, flimsy exterior that is prone to breaking during unmolding—the moment of highest pressure for any host.
For a guaranteed perfect crust, think like a professional chef. Use rigid stainless steel or aluminum rings. They provide not only superior heat transfer but also a perfectly uniform shape. This isn’t just a preference; it’s a strategic choice based on the thermal engineering required for a flawless result. The rigidity ensures the cake holds its form, and the conductivity ensures it bakes from the outside-in quickly and efficiently.
How to prepare your lava cakes 3 days in advance and bake them on demand?
The true secret to a stress-free dessert service is preparing it well in advance. The lava cake, conceived as a two-part system, is perfectly designed for this. The core principle is to create a stable, frozen ganache center that acts as a thermal sink, or a “time-delay” mechanism, inside the cake batter. This is what allows you to assemble the cakes days ahead and bake them from frozen or refrigerated on demand.
First, prepare your rich ganache. Once cooled, portion it into small spheres—using a small ice cream scoop or two spoons—and place them on a parchment-lined tray. Freeze these ganache balls until they are solid. This is your molten core, ready and waiting. The cake batter itself can be made, poured into your prepared rings or ramekins, and stored in the refrigerator for up to two days. When you’re ready to bake, you simply press one frozen ganache ball into the center of each portion of batter.
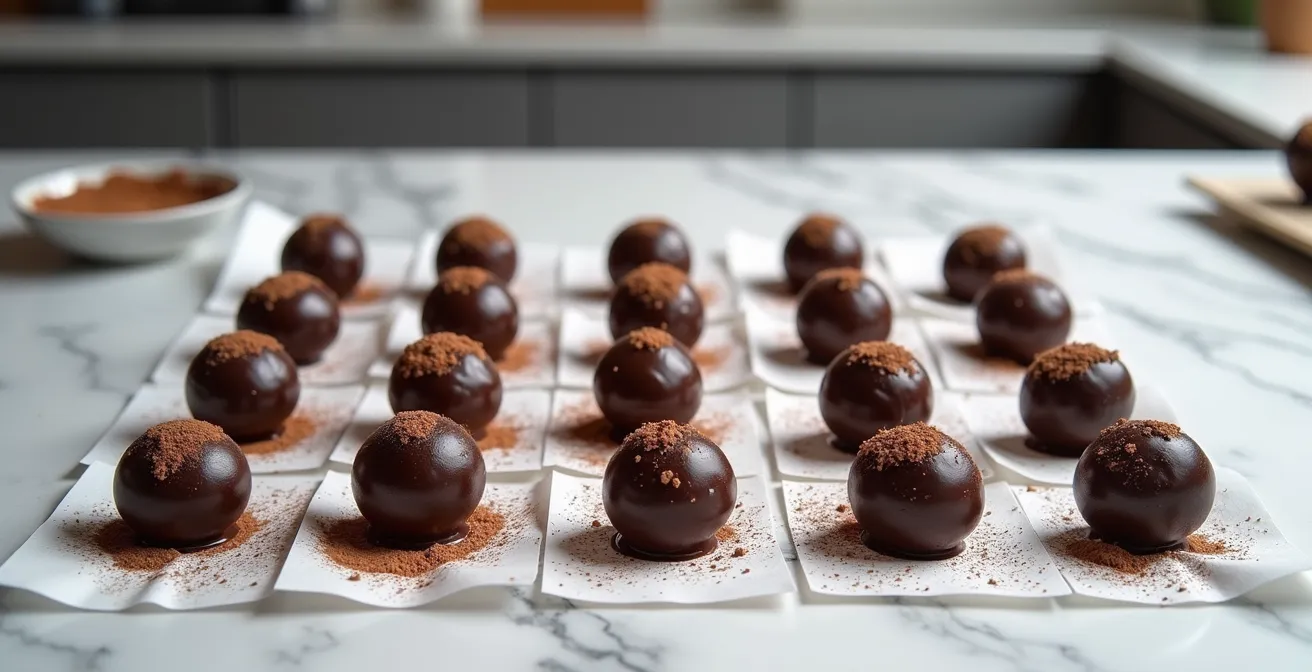
As the illustration shows, having these perfectly portioned ganache cores ready transforms your process. Baking from a refrigerated state simply requires a slight adjustment. According to one make-ahead method, you may need to increase the baking time by 2-4 minutes or raise the oven temperature by 10°C (about 20°F) for the first 5 minutes to compensate for the colder start. This method not only saves you time on the day of your dinner party but also enhances the molten effect. The frozen ganache takes longer to melt, creating a larger temperature differential and a more dramatic, liquid center.
Gluten or gluten-free: which powder ensures the finest structure?
Many bakers worry that the small amount of flour in a lava cake recipe can make it tough or chewy. This leads some to seek gluten-free alternatives, believing they will yield a more delicate result. However, this concern is largely misplaced. The primary structural component in a lava cake is not gluten; it’s the coagulation of egg proteins. As an expert baker’s guide points out, the structure of a lava cake comes primarily from the coagulation of egg proteins, not a gluten network. The flour’s role is minimal, acting more as a binder than a primary structural agent.
This means you have flexibility. Using a small amount of all-purpose flour is perfectly acceptable and will not result in a tough cake unless you drastically overmix the batter, which is the real culprit in developing gluten. In fact, for those who need a gluten-free option, the news is excellent: lava cakes perform beautifully with gluten-free flours. Because you are not relying on gluten for structure, blends based on rice flour and starches like tapioca or cornstarch work exceptionally well, often creating an even more tender and delicate crumb.
The choice between gluten and gluten-free flour is therefore less about structural integrity and more about the final texture you desire and the dietary needs of your guests. A gluten-free blend will inherently prevent any risk of toughness from overmixing and can result in a beautifully delicate cake wall.
This comparative table breaks down the performance of each option, showing that both can lead to success when the true structural role of eggs is understood.
| Property | Gluten Flour | Gluten-Free Blend |
|---|---|---|
| Structure Formation | Creates chewy network | Provides tender texture |
| Risk of Overmixing | High – develops toughness | Low – no gluten to activate |
| Optimal Blend | All-purpose flour | Rice flour + tapioca starch |
| Texture Result | Can become rubbery | Delicate, tender walls |
The greasing mistake that breaks your cake when you serve it
There is no greater moment of anxiety for a host than the unmolding of the lava cake. You tap the bottom, lift the ramekin, and hold your breath. Whether the cake releases cleanly or breaks apart comes down to a single, critical step: the preparation of the mold. Many home bakers make the mistake of using melted butter and flour, a combination that can actually work against you. Melted butter contains milk solids and water, and the solids can burn at high heat, creating sticky spots. Using butter can be risky, as butter’s milk solids can burn and create adhesion at temperatures above 400°F (200°C), a temperature easily reached in many ovens.
The foolproof professional method is to create a non-stick layer that acts like microscopic ball bearings. This is achieved with two specific ingredients: solid vegetable shortening and cocoa powder. Shortening has a higher smoke point than butter and contains no milk solids, eliminating the risk of burning and sticking. The cocoa powder provides a dry, particulate layer that prevents the cake batter from adhering to the sides.
The technique is as important as the ingredients. You must apply the shortening with upward strokes, creating tiny ridges that will help the cake climb the sides of the mold as it bakes. After a thorough coating, you dust with cocoa powder, ensuring every surface is covered, then tap out the excess. This meticulous preparation is your insurance policy for a clean release, allowing the cake to slide out gracefully, preserving its delicate structure for that show-stopping presentation.
Action plan: The infallible ramekin preparation technique
- Apply a thin, even layer of solid vegetable shortening to the entire interior of the ramekin or ring, using a pastry brush or paper towel with distinct upward strokes.
- Add a spoonful of high-quality cocoa powder (never flour for a dark cake, as it leaves a white residue) into the ramekin.
- Tilt and tap the ramekin to coat the entire greased surface with the cocoa powder, creating a complete, dry barrier.
- Invert the ramekin and tap it firmly on the counter to remove all excess powder, leaving only a fine, non-stick film.
- Refrigerate the prepared ramekins until you are ready to fill them. A cold, firm surface further prevents sticking.
When to serve: why waiting 2 minutes after the oven maximizes flavor?
The instinct is to rush the lava cake from the oven to the table, fearing that any delay will cause the center to set. This is a mistake. A crucial, yet often-ignored, step is to let the cake rest for exactly two minutes after it comes out of the oven. This brief pause is not about letting it cool; it is a critical phase of structural and flavor development.
From a structural standpoint, the cake is extremely fragile when it first emerges. The two-minute rest allows for carryover cooking to finish setting the outer crumb, giving the cake just enough stability to withstand being unmolded. As one successful recipe notes, you must “Stand for 2 minutes to let the cake stabilise a bit so it won’t collapse when you turn it out.” Without this rest, the cake is far more likely to tear or fall apart.
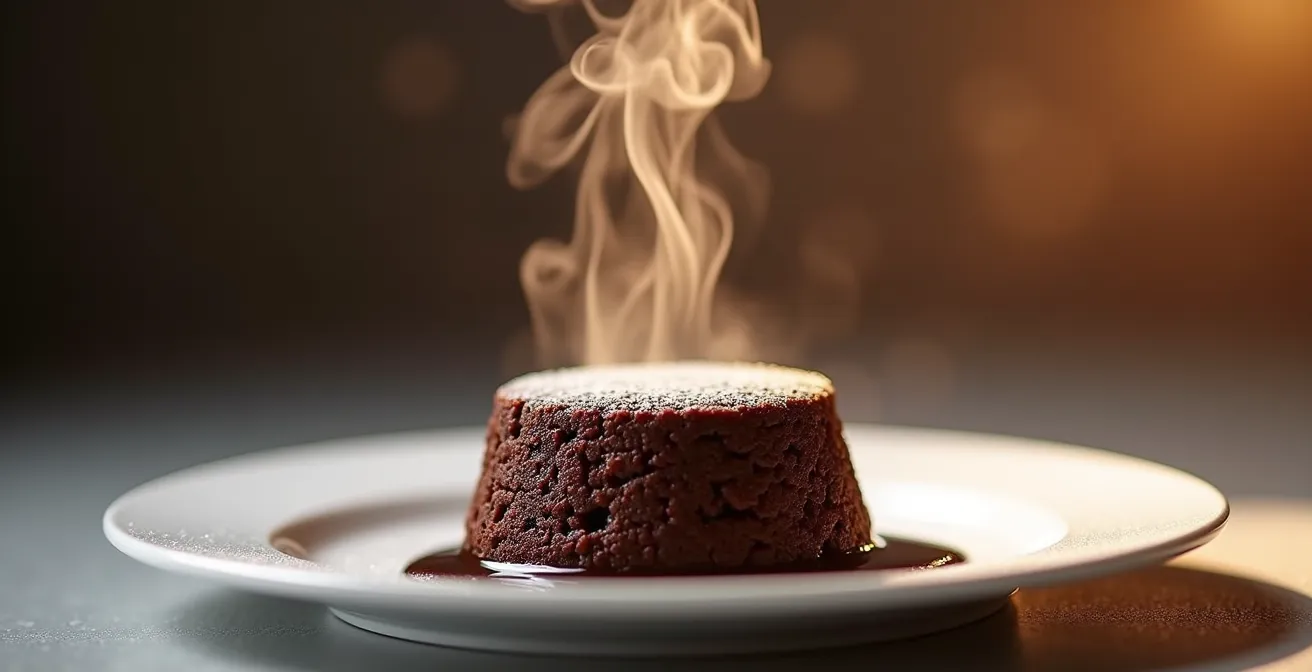
More importantly, this pause is essential for flavor. When the cake is scorching hot, the most volatile aromatic compounds in the chocolate escape too quickly, overwhelming your palate. The two-minute wait allows the cake to cool just enough for these aromas to be released more slowly and elegantly, as symbolized by the delicate steam in the image. This allows the complex, subtle notes of the chocolate to be fully appreciated. It’s the difference between a blast of generic “chocolate” flavor and a nuanced tasting experience. So, resist the urge to rush. That 120-second pause is what elevates a good lava cake to a great one.
Dark or milk chocolate ganache: what mandatory ratio changes for cream/chocolate are obligatory?
The heart of your lava cake—the molten ganache—requires precise ratios to achieve the perfect “ooze.” Not all chocolates are created equal, and you cannot use the same recipe for dark and milk chocolate. The key difference lies in their composition: milk chocolate contains significantly more sugar and milk solids, which act as softeners. Dark chocolate, on the other hand, is richer in cocoa solids and cocoa butter, which makes it set much more firmly.
Therefore, to achieve the same flowing consistency, the chocolate-to-cream ratio must be adjusted. A standard rule of thumb is to use a 2:1 ratio of chocolate to cream by weight for a 60-70% dark chocolate. However, for milk chocolate, you must reduce the amount of cream. A trusted guide suggests that dark chocolate ganache works at a 2:1 ratio while milk chocolate requires a 3:1 ratio. This means for every 300g of milk chocolate, you would use only 100g of cream.
Ignoring this adjustment is a common cause of failure. Using a dark chocolate ratio with milk chocolate will result in a ganache that is far too soft and runny; it will likely leak out of the cake during baking or create a watery, unappealing center. Conversely, using a milk chocolate ratio with dark chocolate will create a core that is too firm and fudgy, failing to deliver that signature liquid flow when cut. Mastering this ratio is fundamental to controlling the final texture of your molten core.
The mistake of adding too much vanilla, which kills the subtlety of a Grand Cru
When working with high-quality ingredients, the philosophy should be “less is more.” This is especially true for chocolate. A common habit is to add a generous splash of vanilla extract to any chocolate recipe, believing it enhances the flavor. While vanilla can elevate a standard, one-dimensional chocolate, it becomes a liability when you are using a premium or “Grand Cru” chocolate.
The better the chocolate, the less vanilla you should use – vanilla acts as a helper for one-dimensional chocolate but masks the terroir notes in Grand Cru.
– Professional chocolate tasting principle, Fine chocolate appreciation guide
A Grand Cru chocolate is chosen for its unique flavor profile, its “terroir”—the subtle notes of fruit, spice, or earth derived from its origin. A powerful flavor like vanilla can completely overwhelm and mask these delicate characteristics. You wouldn’t add a flavor packet to a fine wine, and the same principle applies here. Using too much vanilla is a disservice to the expensive, high-quality chocolate you’ve invested in.
Instead of defaulting to vanilla, consider enhancers that complement rather than dominate the chocolate’s natural profile. Your goal is to amplify its inherent qualities. Here are some sophisticated alternatives:
- A tiny pinch of finely ground espresso: This doesn’t add a coffee flavor but rather deepens and amplifies the roasted notes of the chocolate.
- A single flake of fleur de sel: Salt is a natural flavor brightener. A minuscule amount can cut through the richness and make the chocolate notes pop.
- Minimal spice: A hint of cardamom or cinnamon can be used for specific pairings, but it should be barely perceptible.
- Nothing at all: For a truly exceptional chocolate, the purest expression is often to let it stand on its own.
Key takeaways
- The secret is a two-part system: a frozen ganache core inside a cake batter, creating a controlled melt.
- Stainless steel rings are superior to silicone due to faster heat conduction, creating a firm crust that prevents collapse.
- The cake’s structure comes from egg protein coagulation, not gluten, making gluten-free versions equally successful.
Why using a high-fat ganache slows down its cooking in the oven?
We’ve established that a pre-made ganache core is the secret to a guaranteed molten center. Now, let’s refine that concept with one more layer of thermal science: the role of fat. The ratio of fat in your ganache does more than affect its texture; it acts as a form of thermal insurance during baking. Fat is a poor conductor of heat compared to water. In fact, scientific data shows that fat conducts heat at approximately one-third the rate of water with thermal conductivity of 0.2 W/mK for fats versus 0.6 W/mK for water.
The cream in your ganache contains both fat and water. By using a higher ratio of chocolate to cream (e.g., 2.5:1 instead of 1:1), you are effectively increasing the overall fat percentage of your ganache core. This high-fat core becomes a “thermal sink” that heats up much more slowly than the surrounding cake batter, which has a higher water content. As noted in a professional technique guide, a thicker ganache made with less cream “oozes more thickly and slowly,” preventing it from running out too quickly. This slow heat absorption is precisely what you want.
This scientific principle gives you a wider, more forgiving baking window. The cake batter can fully cook and form a stable crust while the high-fat ganache core gently and slowly melts, without ever getting hot enough to “cook.” This is the ultimate expression of control over your lava cake. You are not just hoping the center stays liquid; you are engineering it to do so by leveraging the insulating properties of fat. This is why a richer, thicker ganache is not just a flavor choice, but a technical one for a foolproof result.
Frequently asked questions on The Science of a Liquid Center and Firm Crust
Why does milk chocolate need less cream than dark chocolate?
Milk chocolate contains more sugar and milk solids which act as softeners, requiring less liquid to achieve the same consistency. Dark chocolate, with its higher cocoa butter content, sets firmer and thus needs more cream to become fluid.
How does cocoa percentage affect ganache firmness?
The higher the cocoa content (e.g., 70% vs 55%), the more cocoa butter the chocolate contains. Since cocoa butter is solid at room temperature, a ganache made with higher percentage chocolate will set more firmly, requiring a more precise ratio of cream to ensure it flows properly when heated.
What happens if the ganache ratio is incorrect?
An incorrect ratio leads to predictable failures. Too much cream creates a runny, watery ganache that may leak out of the cake during baking or create a soupy mess. Too little cream results in a firm, fudgy ganache that won’t flow when the cake is cut, defeating the entire purpose of a “lava” cake.