In summary:
- Apply a thin, protective layer of chocolate (chablon) to your ganache centers to prevent melting and maintain sharp edges.
- Master the temperature dialogue: dip centers at 18-20°C into chocolate at 31-32°C to prevent cracks and ensure a smooth set.
- Choose the right tool for the job—a 3-prong fork for larger, rectangular bonbons and a 2-prong for smaller, delicate pieces.
- The key to eliminating the ‘foot’ is a quick, decisive scrape of the fork’s bottom against the bowl’s edge before placing the bonbon.
For the artisan chocolatier, there is no greater frustration than pulling a perfectly crafted ganache from a pool of liquid satin, only to have it settle with a thick, clumsy “foot” at its base. It’s the one detail that separates the homemade from the master-crafted. Many will advise you to simply “tap off the excess chocolate” or use a “good temper,” but this advice barely scratches the surface. It ignores the subtle dance of an artist’s hands, the deep understanding of material, and the rhythm that defines true mastery. This is a craft that extends beyond simple mechanics into the realm of feel and timing, a skill honed not just with tools but with intuition.
But what if the secret to a flawless, footless bonbon wasn’t in a single magic trick, but in a sequence of controlled, artistic gestures? The truth is that achieving that coveted thin, snappy shell is a matter of mastering an artisan’s rhythm—a fluid choreography between temperature, timing, and touch. It’s about creating a dialogue between the cool ganache and the warm chocolate, choosing the fork as an extension of your own hand, and executing a final, signature scrape that leaves nothing but perfection behind. This is where technique transforms into artistry.
This guide will deconstruct that rhythm, breaking down the art of manual enrobing into its essential, masterable components. We will explore the foundational preparation, the critical temperature balance, the choice of tools, and the precise movements that culminate in a professionally finished bonbon. Get ready to turn frustration into finesse.
Summary: The Artisan’s Path to a Footless Bonbon
- Why chablonner vos ganaches est-il essentiel avant de les tremper ?
- Froid ou ambiant : à quelle température tremper vos intérieurs pour éviter les craquelures ?
- Fourchette 2 dents ou 3 dents : quel outil pour quelle forme de bonbon ?
- L’erreur de geste qui laisse une flaque de chocolat à la base du bonbon
- Quand poser la feuille d’or : le timing précis avant que le chocolat ne fige
- Mélangeur à roues ou conche longitudinale : lequel choisir pour une production de 50 kg/semaine ?
- 1 goutte ou 5 gouttes : quel indice de fluidité pour une fontaine à chocolat ?
- How to Create a Thin and Snappy Shell for Belgian Molded Chocolates?
Why chablonner vos ganaches est-il essentiel avant de les tremper ?
Before the grand performance of dipping, every bonbon center needs its armor. This is the role of the “chablon,” a thin, pre-coating of tempered chocolate applied to your ganache slabs. Think of it not as an extra step, but as the foundational gesture that guarantees success. Its primary purpose is to create a stable, protective barrier. This armor prevents softer centers from deforming or melting when introduced to the warmth of the enrobing chocolate. Without it, the sharp, clean edges of a perfectly cut ganache can quickly blur, and the risk of the center breaking apart on the fork increases dramatically.
This protective layer is particularly vital for delicate fillings. As expert chocolatiers know, a chablon is the only way to ensure a complete seal for high-moisture centers like fruit purées, preventing them from “bleeding” into the shell. For butter or cream-based ganaches, it maintains their integrity and shape. The difference is not subtle; it is the line between a professional and an amateur result.
The following table, based on professional findings, illustrates just how critical this preparatory step is for different types of centers. As the data from a comparative analysis by chocolate professionals shows, the chablon is not optional for achieving perfection.
| Ganache Type | Without Chablon | With Chablon | Recommended Thickness |
|---|---|---|---|
| Butter Ganache | 50% melting risk | 0% melting | 2mm |
| Cream Ganache | Sharp edges lost | Perfect edges maintained | 1.5mm |
| Fruit Purée | Surface bleeding | Complete seal | 2.5mm |
To apply it, simply spread a thin (1-2mm) layer of tempered chocolate onto the base of your ganache slab with a palette knife. A brief chill for about 5 minutes at 16-18°C is all that’s needed to set this protective footing before you proceed to cut your centers. This simple act is the first note in the symphony of a perfect enrobing process.
Froid ou ambiant : à quelle température tremper vos intérieurs pour éviter les craquelures ?
Perfect enrobing is a dialogue between temperatures. The most common cause of cracked or crazed chocolate shells is not a faulty temper, but a “thermal shock”—the violent disagreement between a very cold center and the warm, tempered chocolate. When a ganache is too cold, the shell sets too rapidly and unevenly, creating immense tension that results in fine cracks as the bonbon returns to room temperature. The goal is not to use the coldest centers possible, but to find a harmonious balance.
The universal sweet spot for most fillings is a center that feels cool, but not cold, to the touch. Professional chocolatiers aim for a precise range. According to industry best practices, it is ideal to maintain centers at 18-20°C (64-68°F) before dipping them into tempered chocolate held at its working temperature of 31-32°C (88-90°F). This small temperature differential allows the shell to crystallize gracefully, creating a strong, stable, and seamless coating.
However, the ideal temperature is not one-size-fits-all; it depends on the heart of your bonbon. The artist-chocolatier must adapt their approach based on the filling’s composition:
- High-water fruit ganaches: These are best dipped closer to room temperature, around 20-22°C, to minimize moisture migration that can cause delayed cracking.
- Butter-based pralinés: Their stable fat structure makes them more forgiving. They can be dipped slightly cooler, at 16-18°C, without issue.
- Caramel centers: These must be at a minimum of 22°C. Dipping them any colder risks causing the sugar to crystallize from the thermal shock, resulting in a grainy texture.
By learning to “listen” to your fillings and controlling this crucial temperature dialogue, you move from simply coating chocolate to truly crafting it. Let your centers rest at room temperature for a while after removing them from the cooler; this simple patience is a key ingredient for a flawless, crack-free finish.
Fourchette 2 dents ou 3 dents : quel outil pour quelle forme de bonbon ?
The dipping fork is not merely a tool; it is an extension of the chocolatier’s hand and intent. The choice between a two-prong and a three-prong fork is a deliberate, artistic decision, guided by the weight, shape, and stability of the bonbon you are enrobing. Using the wrong tool is like a painter choosing a broad brush for fine detail—it compromises control and elegance. The goal is to securely hold the center while leaving the smallest possible “scar” on the finished piece.
The guiding principles are stability and subtlety. A three-prong fork offers a wider, more stable base, making it the superior choice for larger, heavier, or rectangular bonbons. Professionals report that this design provides the necessary support for centers weighing over 15g, preventing them from tipping or sliding during the delicate dipping and scraping motion. The three points of contact distribute the pressure evenly, giving you confident control.
In contrast, the two-prong fork is the master of delicacy. It is ideal for smaller, lighter, or irregularly shaped pieces where a larger fork would be clumsy. Its minimal contact points allow for a more agile dipping process and leave a less conspicuous mark on the bonbon’s base. For the truest purists, a spiral dipping tool is another option, cradling round truffles in its well and eliminating fork marks entirely, as seen in the comparison below.
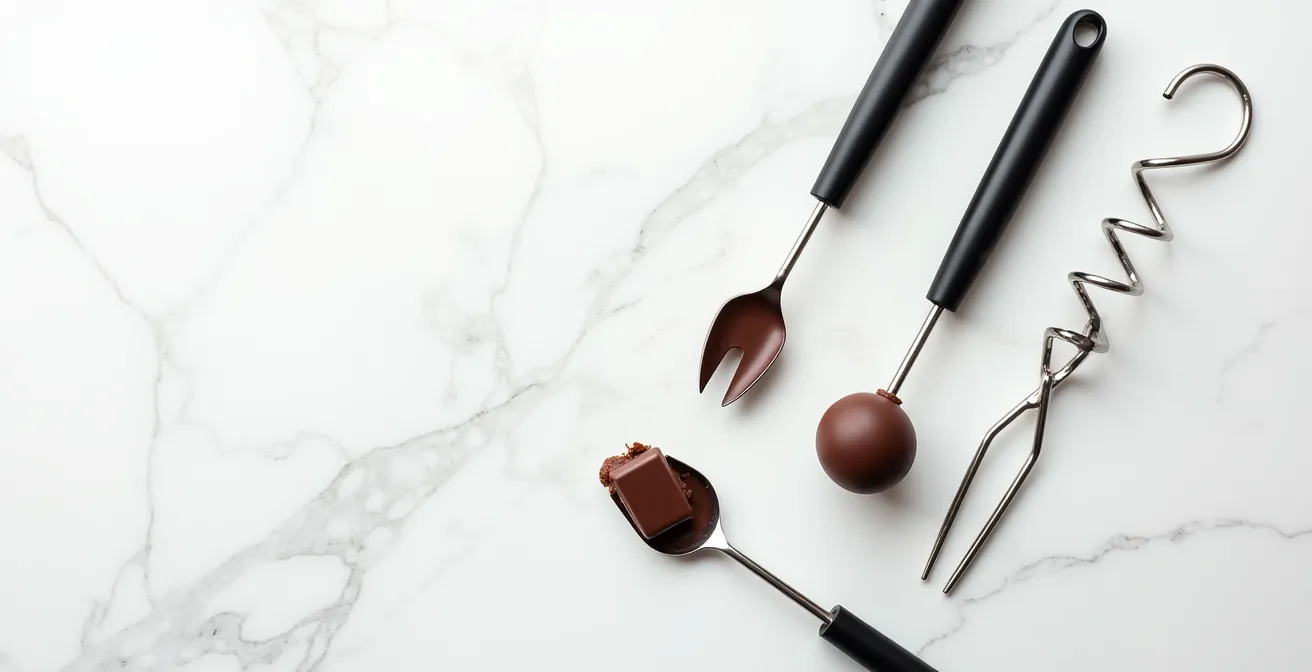
Ultimately, the choice is about feel. Your part of the filling should poke just over the front of the fork, allowing you to guide it through the chocolate with precision. Having both a two-prong and a three-prong fork in your toolkit is not a luxury; it’s a necessity for any artisan dedicated to executing each piece with the appropriate grace and control. The tool must fit the canvas.
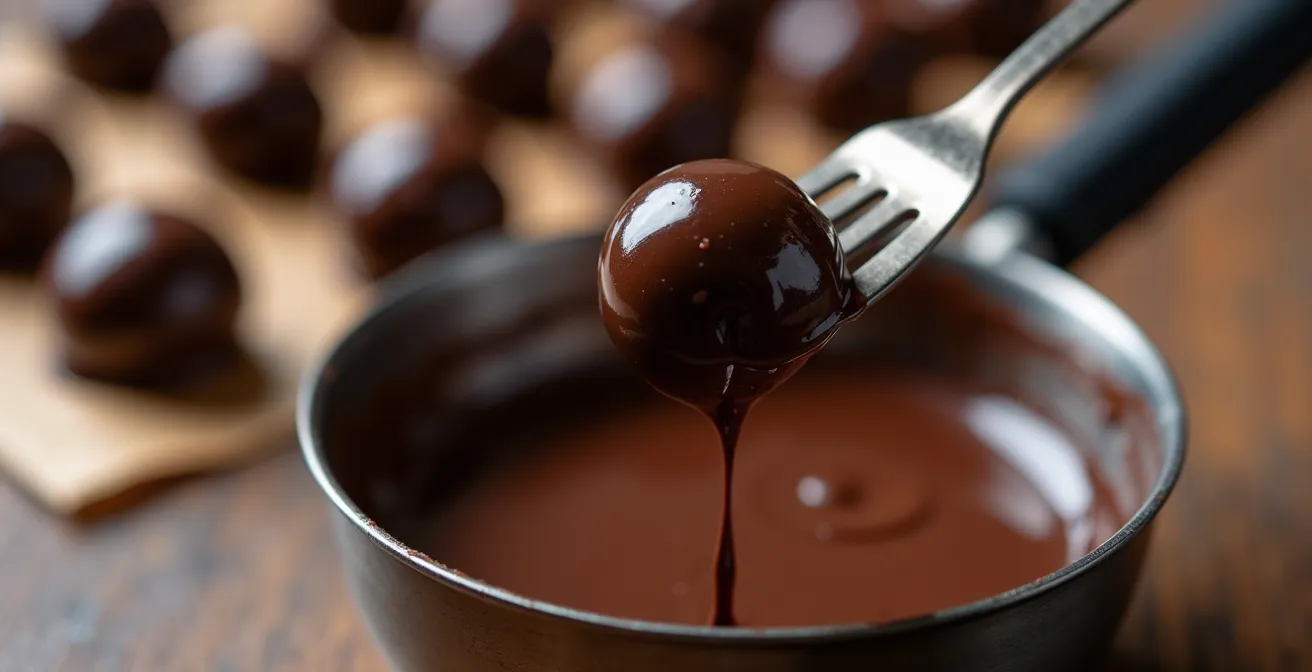
L’erreur de geste qui laisse une flaque de chocolat à la base du bonbon
The dreaded “foot”—that unsightly puddle of chocolate at the base of your bonbon—is the result of a single, flawed moment in your dipping rhythm. It is not caused by the chocolate or the temperature, but by a failure to remove the excess coating with a clean, decisive gesture. Mastering the motion to eliminate this excess is the single most important physical skill in manual enrobing. As Callebaut Chef Russ Thayer emphasizes, the entire point of the technique is to avoid this specific flaw.
This way you’ll avoid creating a ‘foot’ (a little puddle of excess chocolate at the bottom of your dipped chocolate) under the praline.
– Russ Thayer, Callebaut Chocolate Academy Chef, in the Callebaut Hand-Dipping Chocolate Tutorial
The solution lies in a swift, practiced sequence—a 5-second rhythm that becomes muscle memory. It’s a dance of submersion, tapping, and scraping that, when perfected, guarantees a clean base every time. Many apprentices discover that simply tapping the fork is not enough; the critical step is the final scrape. This is not a hesitant wipe but a confident, shearing motion.
Your Action Plan: The 5-Second Perfect Dip
- Seconds 1-2 (The Submersion): Quickly and smoothly push the filling into the chocolate with your fork until it is fully submerged and level with the surface. Lift it out cleanly.
- Second 3 (The Tap): Give the fork two sharp, firm taps against the surface of the bowl. This is not a gentle pat; the vibration helps shed the first layer of heavy, excess chocolate.
- Second 4 (The Signature Scrape): This is the crucial moment. Cleanly scrape the entire bottom of the fork against the sharp edge of your bowl. The motion should be fluid and complete, removing the pooling chocolate that would otherwise form the foot.
- Second 5 (The Landing): With the fork at a 45-degree angle to your parchment paper, slide the bonbon off with a gentle forward push. This sliding motion prevents the bonbon from simply dropping and creating a new puddle.
Practice this rhythm until it feels as natural as breathing. The submersion, the two sharp taps, the clean scrape, and the angled slide—this is the choreography that separates the artisan from the amateur and ensures every single bonbon stands proud and footless.
Quand poser la feuille d’or : le timing précis avant que le chocolat ne fige
The final flourish—a delicate speck of gold leaf, a perfectly placed nut, a transfer sheet design—is a testament to the chocolatier’s timing. This is a moment measured not in minutes, but in seconds. Apply the decoration too soon, and it will sink into the still-liquid chocolate, its sharp detail lost. Apply it too late, and it won’t adhere at all, bouncing off the now-solid shell. This final act requires you to feel the “final breath” of the chocolate as it crystallizes.
The moment of setting is a fleeting window of opportunity when the chocolate has lost its wet shine but has not yet become fully hard. It has just enough surface tension to hold the decoration without swallowing it. Extensive professional testing has pinpointed this critical moment. Under ideal conditions, the perfect window for applying gold leaf is 30-45 seconds after the bonbon has been placed on the parchment paper. This is your target.
However, an true artisan knows that this window is not fixed; it is dictated by the ambient temperature of your workshop. A warmer room accelerates the setting process, shortening your window, while a cooler room extends it. You must learn to read the room as much as you read the chocolate:
- Cool Room (18°C / 64°F): You have a more forgiving window of 45-60 seconds before the chocolate sets.
- Ideal Room (20°C / 68°F): This is the sweet spot, giving you the standard 30-45 second window.
- Warm Room (22°C / 72°F): You must work quickly. The window shrinks to just 20-30 seconds, and there’s an increased risk of a dull finish on the chocolate.
What if you miss the window? All is not lost. For a tiny decoration like gold leaf, an “emergency fix” is possible. Apply a micro-dot of fresh tempered chocolate with the tip of a toothpick to the spot where you want the decoration to go, then immediately place the gold leaf. It’s a delicate save, but a valuable technique for rescuing a piece. Mastering this final timing is the signature of a chocolatier who is in complete control of their craft, from start to finish.
Mélangeur à roues ou conche longitudinale : lequel choisir pour une production de 50 kg/semaine ?
For the large-scale chocolate manufacturer, the choice between industrial machines like wheel mixers and longitudinal conches is a matter of refining tons of chocolate. But for the artisan chocolatier producing a modest 50 kg per week, these machines are irrelevant, expensive, and antithetical to the hands-on craft. The artisan’s goal is not mass refinement, but achieving maximum fluidity and a smooth mouthfeel from their chosen couverture without a four-figure investment. The secret doesn’t lie in a giant machine, but in a clever, manual technique.
A boutique chocolatier can achieve results that rival industrial conching through focused agitation. The principle is the same: movement breaks down any remaining particle clumps and evenly distributes the cocoa butter, leading to a silkier, more fluid chocolate. A case study of a small-scale producer found that a combination of manual and simple mechanical agitation dramatically improved their coating consistency by 40%. Their method is accessible to any artisan.
The technique involves two simple stages after melting your chocolate and before tempering. First, manually agitate the melted chocolate with a spatula for a solid 10 minutes. This begins the process of smoothing the texture. Then, for the master stroke, use a standard immersion blender on its lowest speed for just 30 seconds. This short, powerful burst creates a perfect vortex that emulsifies the chocolate beautifully, ensuring a homogenous and highly fluid texture ideal for enrobing.
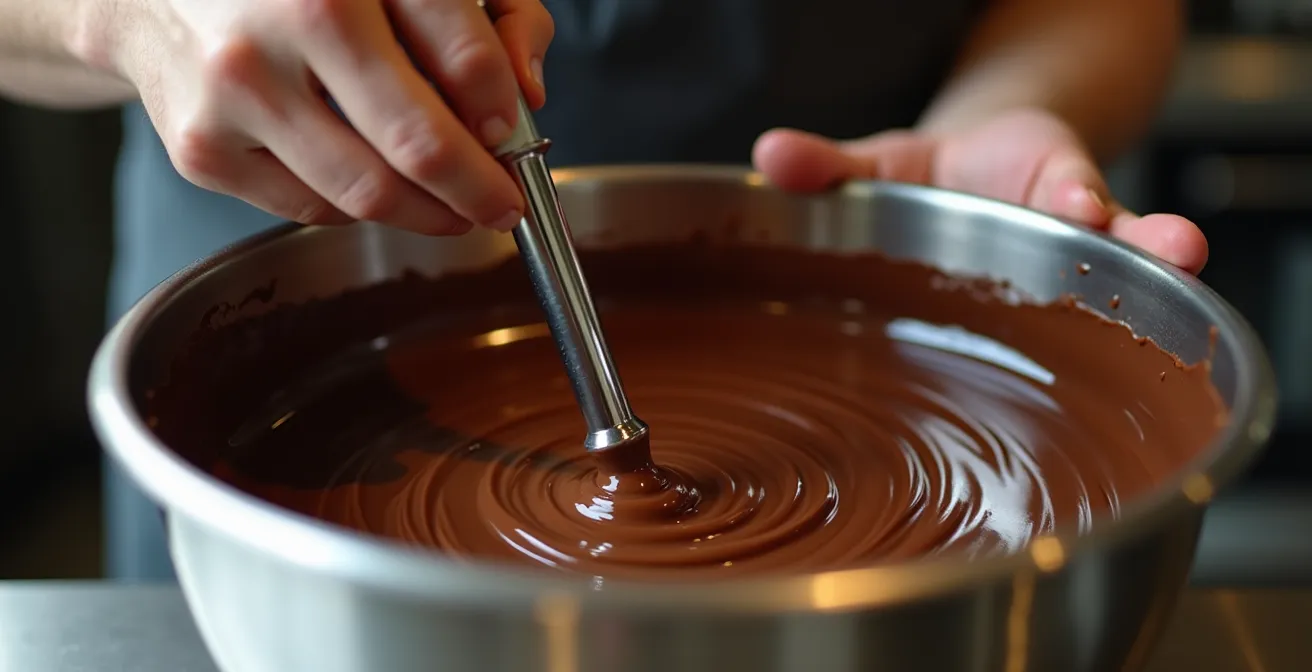
This immersion blender technique is the artisan’s answer to the conching machine. It is a testament to the philosophy that superior results often come from a deep understanding of principles, not the size of the equipment. It provides the necessary fluidity for a thin, elegant shell without sacrificing the hands-on nature of the craft. For a 50 kg/week production, this method is not a compromise; it’s the smarter, more artistic choice.
1 goutte ou 5 gouttes : quel indice de fluidité pour une fontaine à chocolat ?
The “drop” rating on a bag of couverture is the language of fluidity. This simple symbol, ranging from one to five drops, communicates the chocolate’s viscosity, which is determined by its cocoa butter content. Understanding this language is essential for selecting the right chocolate for the right job. Using a thick, one-drop chocolate designed for molding will result in a frustratingly thick, clunky shell when dipping. Conversely, a five-drop chocolate, while perfect for a spray gun, may be too thin and transparent for a satisfying hand-dipped bonbon.
For the specific art of manual enrobing, where the goal is a shell that is thin but not fragile, you need a chocolate that flows gracefully off the fork but still provides complete coverage. While a three-drop chocolate is often considered the all-purpose standard, many master chocolatiers prefer a slightly more fluid option to achieve that signature delicate coating. Experience shows that the ideal viscosity for this task is found in chocolates rated with 3 to 4 drops. A study of professional practices confirms that professional chocolatiers choose chocolate with a 3-4 drop rating for the perfect balance of flow and coverage in manual dipping.
This table breaks down the drop system and its intended application, making it clear why the 3-4 drop range is the sweet spot for the artisan dipper.
| Drop Rating | Cocoa Butter % | Best Application | Shell Thickness |
|---|---|---|---|
| 1-2 drops | 28-30% | Molding, sculpting | Thick (3-4mm) |
| 3 drops | 31-33% | Standard enrobing | Medium (2-3mm) |
| 4-5 drops | 34-38% | Thin coating, spray gun | Thin (1-2mm) |
What if you only have a standard 3-drop chocolate on hand but desire a thinner shell? You can easily adjust the fluidity yourself. The key is to add pure cocoa butter (in callet form or Mycryo powder) without breaking your temper. To transform a 3-drop into a more fluid 4-drop chocolate, simply melt in an additional 1-2% of cocoa butter by weight, ensuring the chocolate’s working temperature remains stable at 31-32°C. This small adjustment gives you complete artistic control over the final thickness of your shell.
Key takeaways
- The ‘chablon’ is a non-negotiable first step. This thin chocolate armor protects your centers and guarantees sharp, professional edges.
- Success lies in the ‘temperature dialogue.’ Dipping cool (18-20°C) centers into warm (31-32°C) chocolate is the secret to a crack-free, stable shell.
- The footless finish is all in the wrist. A quick, two-beat tap followed by a clean, decisive scrape of the fork’s bottom is the essential motor skill to master.
How to Create a Thin and Snappy Shell for Belgian Molded Chocolates?
The final, defining characteristic of a masterfully crafted bonbon is its “snap.” It’s that clean, sharp crack you hear and feel as you bite through the shell, a sound that signals a perfect temper and an exquisitely thin coating. It’s the audible proof of quality. As the legendary chocolatier Peter Greweling states, this sensory experience is no accident.
The audible ‘snap’ is a direct result of a thin, even coating of perfectly tempered chocolate.
– Peter Greweling, in Chocolates and Confections: Formula, Theory, and Technique
While the principles for molded chocolates and hand-dipped bonbons overlap, achieving that snap in a hand-dipped piece relies heavily on the final phase: the cooling process. A perfect temper and a thin coating are the prerequisites, but the snap itself is born in how the chocolate sets. Slow, uncontrolled cooling at a warm room temperature can lead to a softer shell. The secret, as practiced by Belgian chocolatiers, is a rapid initial cooling phase to lock the cocoa butter’s crystal structure into its strongest form (Beta V).
This doesn’t mean shocking the bonbons in a cold refrigerator, which would cause cracking and condensation. Instead, it’s a controlled, brief exposure to a cool environment immediately after dipping. A Belgian chocolatier’s technique for achieving superior snap involves placing the freshly dipped bonbons directly into a dedicated cooling zone at 16-18°C (61-64°F) for just 5 minutes. This quick chill sets the shell rapidly and promotes the formation of a dense, brittle crystal structure.
After this initial 5-minute “snap-setting” phase, the bonbons are moved to a more moderate environment of 18-20°C (64-68°F) for a full 24 hours. This longer period allows the rest of the chocolate to crystallize fully without stress, preserving the glossy shine and ensuring the bonbon is stable for packaging. This two-stage cooling process—a quick chill followed by a long, patient rest—is the final piece of the puzzle, transforming a thin shell into one that delivers that deeply satisfying, signature snap.
Embrace these principles not as rigid rules, but as the notes of a composition. Begin practicing this rhythm of preparation, temperature control, and precise movement. With each batch, your hands will learn the feel of the perfect scrape and the timing of the final breath, transforming every bonbon you create into a footless, snappy testament to your craft.