In summary:
- Lamination success is not art; it is a science of temperature control. The butter must remain in its “plasticity window” (13-16°C).
- Use high-fat (84% minimum) European-style butter to minimize water content, which prevents layers from rupturing during baking.
- Achieve uniform thickness not through force, but through geometric precision, using guides and rolling from the center outwards.
- The number and type of folds (simple vs. double) directly dictate the final honeycomb structure and texture of the pastry.
- Minimal initial dough mixing is critical; the gluten structure should be developed during the folding process, not before.
The pursuit of the perfect croissant is a journey paved with frustration. You follow the steps, chill the dough, and fold with care, only to be met with a dense, bready crumb or, worse, pools of melted butter on your baking sheet. The dream of a light, airy honeycomb structure with 27 distinct, shattering layers seems impossibly distant. Many guides will offer vague advice like “keep everything cold” or “be gentle,” but they fail to address the fundamental mechanics at play. This leaves the passionate baker in a cycle of trial and error, unable to diagnose the root cause of their failures.
The truth is that successful lamination is not an intuitive art; it is an engineering problem. The key lies in understanding and controlling the physics of temperature and the geometry of pressure. The interaction between the cold dough (détrempe) and the malleable butter is a delicate balance. The butter must be in a precise state of plasticity—solid enough to maintain its form as a distinct layer, yet pliable enough to stretch with the dough without shattering or melting. Achieving this state consistently is not magic; it is a matter of measurement and control.
This guide deconstructs the process, moving beyond intuition to provide a precise, repeatable framework. We will treat the dough not as a single mass, but as a structural composite of butter and dough layers. By mastering the variables—from the exact fat percentage of your butter to the force vector of your rolling pin—you will learn to build, not just fold, your pastry. We will explore how each turn is a geometric multiplication of layers and how to prevent the critical failure point: the rupture of the butter sheet that leads to structural collapse. Prepare to approach your next batch not as a baker, but as an architect of the perfect feuilletage.
For a visual demonstration of the precision and technique discussed, the following video from master baker Bruno Albouze offers an excellent reference.
To navigate this technical deep-dive, the following summary outlines the critical checkpoints we will cover. Each section is designed to build upon the last, constructing a complete understanding of lamination mechanics from raw materials to final bake.
Summary: The Precision Engineering of Laminated Dough
- Why the 84% fat butter is non-negotiable for lamination?
- The kneading error that turns your laminated dough into a leather sole
- Why resting the dough in the fridge between each turn is vital for the layers?
- 3 simple turns or 1 double and 1 simple: which combination for which honeycomb?
- Machine or hands: how to get a regular 3mm thickness at home?
- The force error that pierces the dough and exposes the butter
- How to get an open and crispy honeycomb with your laminated yeast dough?
- Waste problem: how to turn lamination scraps into sellable products?
Why the 84% fat butter is non-negotiable for lamination?
The choice of butter is the foundational decision in lamination, and it is governed by simple physics. The key is not just fat, but the absence of water. Standard butters contain around 80% fat, with the remaining 20% being mostly water and milk solids. This excess water turns to steam too aggressively in the oven, potentially rupturing the delicate dough layers before they can set. It also makes the butter more prone to leaking during proofing and baking. The goal is to create a butter sheet with maximum pliability and structural integrity.
This is where high-fat, European-style butters become essential. Professional baking standards demonstrate that European butter requires a minimum of 82% butterfat, with professional grades reaching 84-86%. This higher fat content drastically reduces the water percentage. For instance, in one cup of butter, the difference can be nearly 10 grams less water, a significant variable when dealing with microscopic layers. This lower moisture content means the butter is more stable at a wider range of temperatures and creates a cleaner separation between layers.
Butterfat at 84% – 86% gives the best pliability, while eliminating the water issues
– Professional Baking Forums Community, Baking Forums Discussion on Laminated Dough
This type of butter is specifically engineered for tourage, designed to be malleable when cold without becoming brittle. It can be pressed and rolled into a thin, even sheet that stretches with the dough rather than breaking through it. Opting for a lower-fat butter is the first and most common point of failure, as it introduces a volatile element (water) that compromises the entire geometric structure you are trying to build. It is a non-negotiable starting point for predictable results.
The kneading error that turns your laminated dough into a leather sole
A common misconception, borrowed from bread making, is that the initial dough (the *détrempe*) needs significant kneading to develop a strong gluten network. This is precisely the opposite of what is required for successful lamination. For bread, you want elasticity—the ability to spring back. For lamination, you need extensibility—the ability to be stretched thin without resistance or tearing. An over-developed, elastic dough will fight you at every turn, shrinking back after being rolled and requiring excessive force to extend.
This excessive force is the enemy of lamination. It compresses the layers and increases the risk of the butter sheet tearing. The goal is a “lack of dough development” in the initial mix. The gluten structure should be built progressively and gently through the process of folding and rolling, not all at once in the mixer. The initial mix should be brief, just until the ingredients form a shaggy, cohesive mass. It will not look smooth or pass the “windowpane test” at this stage, and it shouldn’t.
To achieve this, professional bakers employ specific techniques:
- Short Mix: The dough is mixed just until it comes together, remaining slightly rough. It will become smooth during the subsequent folds.
- Autolyse: Some methods involve resting the flour and water for 20-30 minutes before adding other ingredients. This allows the flour to fully hydrate without mechanical gluten development.
- Fraisage: A French technique where the dough is smeared across the work surface with the heel of the hand. This gently combines ingredients with minimal gluten activation.
By keeping the initial dough weak and extensible, you ensure it will cooperate with the butter layer. It will stretch evenly and thinly, allowing the butter to stretch along with it, preserving the all-important structural integrity of the layers. A dough that is too strong is a recipe for a tough, leathery final product with poor layering.
Why resting the dough in the fridge between each turn is vital for the layers?
The mandatory rest period in the refrigerator between each fold is not merely about “keeping the dough cold.” It is a critical step to re-establish two physical properties: the ideal temperature gradient and the butter’s plasticity window. As you work the dough, the friction from rolling and the ambient temperature of your kitchen inevitably warm the butter. If the butter becomes too warm (above 16°C), it begins to melt and will be absorbed by the dough, effectively destroying the layers you’ve created. The result is a brioche-like, bready texture, not a flaky one.
Conversely, if the butter gets too cold (below 12°C), it becomes brittle. When you try to roll it, it will shatter into “icebergs” instead of stretching into a continuous sheet. These shards of butter will pierce the dough layers, creating holes where butter will leak out during baking. The rest period in the fridge does two things: it chills the butter back into its ideal plasticity window (around 13-16°C) and simultaneously relaxes the gluten in the dough, making it more extensible for the next fold.
This chilling period allows the dough and butter temperatures to equalize and reset. The dough itself should be chilled to around 6-9°C, creating a perfect temperature differential that keeps the butter firm but pliable. A minimum rest of 30 minutes is standard. In warmer environments, you may even need a short 5-10 minute burst in the freezer to quickly firm up the butter if it feels too soft. Ignoring this step is like trying to build a house on a foundation that is still wet; the structure is guaranteed to fail.
3 simple turns or 1 double and 1 simple: which combination for which honeycomb?
The folding process is where the geometry of the feuilletage is truly built. Each “turn” is a mathematical multiplication of layers. There are two primary types of turns: the simple (or letter) fold, which triples the layers, and the double (or book) fold, which quadruples them. The combination you choose directly engineers the final texture and structure of the crumb. It is not an arbitrary choice; it’s a strategic decision based on the desired outcome.
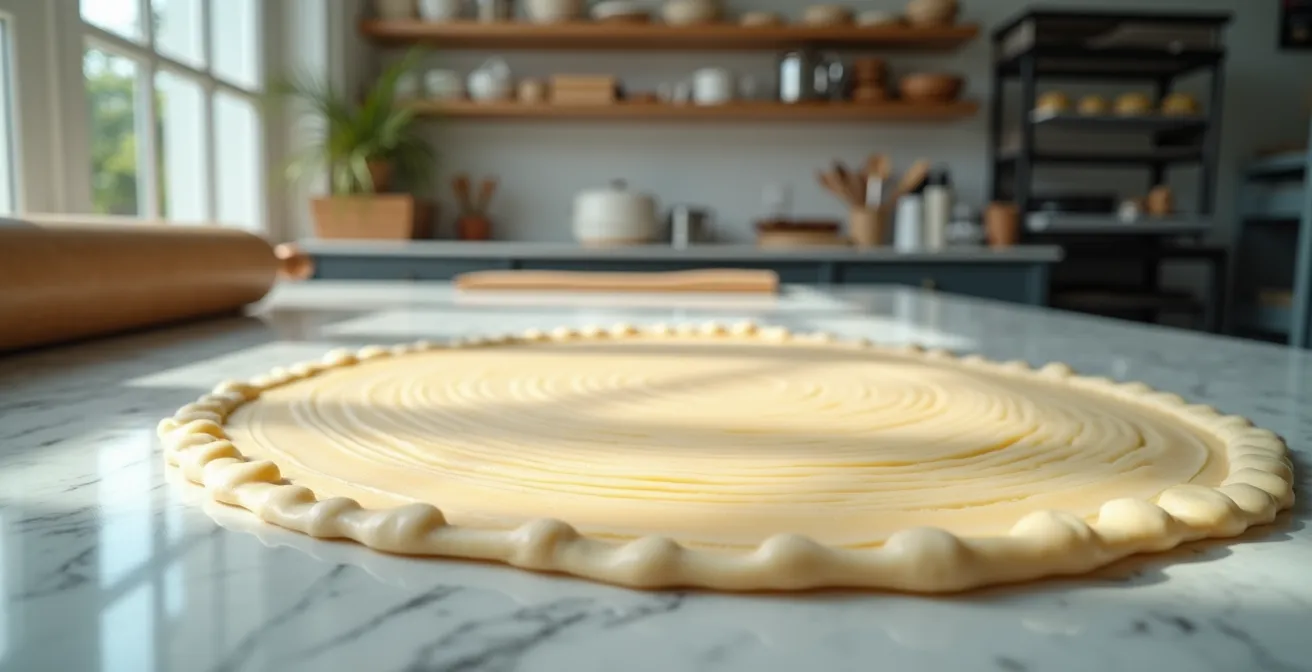
A simple turn involves rolling the dough into a rectangle and folding it into thirds, like a letter. A double turn involves folding both ends to the center, then folding the entire package in half, like a book. The classic French method for croissants called for six simple turns, but modern understanding has refined this. For instance, some standards show that a method with 3 single turns can create up to 81 theoretical layers (though modern calculation methods adjust this number). The key is the final layer count and their thickness.

The image above perfectly illustrates the goal: a delicate, open honeycomb created by steam pushing apart distinct, intact layers. Fewer, thicker layers (from double folds) tend to produce a more open, airy honeycomb ideal for a plain croissant. More, thinner layers (from simple folds) create a slightly tighter, more structured crumb that is better suited for holding fillings, as in a pain au chocolat or Danish pastry. This is because the thinner layers provide more structural support.
The following table illustrates how folding strategies are matched to final products:
| Product | Folding Method | Layer Count | Texture Result |
|---|---|---|---|
| Regular Croissants | 2 double turns | 16 layers | Open, airy honeycomb |
| Chocolate Croissants | 3 single turns | 27 layers | More structured for filling |
| Danish Pastry | 3 single turns | 27 layers | Tender, defined layers |
| Traditional Puff Pastry | Multiple turns | 144 layers | Maximum flakiness |
A common and effective combination for classic croissants is one double turn followed by one simple turn. This yields a desirable number of layers without overworking the dough. The choice is a trade-off between the airiness of the crumb and its structural capacity.
Machine or hands: how to get a regular 3mm thickness at home?
While professional bakeries use large, expensive dough sheeters to achieve perfectly uniform thickness, replicating this precision at home is entirely possible with the right technique. The goal is to roll the dough to a consistent thickness—typically around 3mm for the final rollout—without applying excessive, localized pressure that could rupture the butter layer. The key is to transform the rolling pin from a tool of brute force into an instrument of geometric precision.
The most common error is pressing down too hard in the center of the dough, causing it to become thin in the middle and thick at the edges. The correct technique involves rolling from the center outwards, elongating the dough rather than simply compressing it. Always lift the dough from the work surface between rolls to ensure it is not sticking, adding a whisper of flour as needed and brushing off the excess. A marble rolling pin is an excellent tool, as its weight does much of the work and its cool surface helps maintain the dough’s temperature.
To guarantee a uniform thickness, a simple and highly effective method is to create guide rails. This removes all guesswork from the process, ensuring a perfectly even result every time.
Action Plan: The DIY Guide Rail Method
- Acquire Guides: Place two 3mm thick wooden dowels, metal bars, or even stacks of identical magazines on either side of your dough.
- Position the Pin: Your rolling pin will now rest on these guides. This physically prevents you from rolling the dough any thinner than 3mm.
- Roll with Even Pressure: Roll from the center outwards. The guides ensure that the pressure is distributed evenly across the entire surface.
- Check for Sticking: Frequently lift the dough and lightly flour the surface underneath. An even thickness is impossible if one part is stuck to the counter.
- Manage Butter Texture: If you feel the butter breaking or becoming rigid, allow the dough to rest at room temperature for a few minutes to bring it back into its plasticity window before continuing.
This methodical approach takes the “feel” out of the equation and replaces it with measurable consistency. It ensures that every part of your laminated dough has the same thickness, which in turn guarantees an even rise and a uniform honeycomb structure in the final product.
The force error that pierces the dough and exposes the butter
The most catastrophic failure in lamination is the piercing of the dough, which allows the butter to leak out. This is a structural failure caused by applying a mechanical stress that exceeds the tensile strength of the dough or the shear strength of the butter layer. This can happen for two primary reasons: the dough is too resistant, or the butter is in the wrong state. Both issues are often exacerbated by the use of excessive, uncontrolled force.
A dough that is too resistant is typically the result of using the wrong flour or over-mixing. As professional baking forums report, a flour with a protein content that is too high (above 11.5%) creates an overly elastic dough that fights back when rolled. In fact, 14% protein flour is considered too high for croissants, with the ideal range being 10-11.5%. This resistance tempts the baker to apply more force, leading to a rupture.
The state of the butter is the other critical variable. As discussed, butter that is too cold will shatter under pressure, and its sharp edges will tear through the thin dough. Butter that is too warm will have no structural integrity and will simply squeeze out from the sides or be absorbed. The error of force often happens when a baker tries to roll a package that has been chilled for too long. The butter is rock-hard, and instead of using patience and allowing it to temper slightly, they apply immense pressure, causing a system-wide failure.
The solution is a delicate touch and a deep understanding of the materials. Use the weight of the rolling pin, not your arm strength. If you feel significant resistance, stop. The dough is telling you something is wrong. Either the gluten needs to relax, or the butter is too cold. Patience is the corrective tool. Allowing the dough to rest for 10 minutes at room temperature can make the difference between a perfect lamination and a buttery mess.
How to get an open and crispy honeycomb with your laminated yeast dough?
The final, spectacular rise of laminated dough—the “oven spring”—that creates the open, crispy honeycomb is the result of one final physical reaction: the rapid creation of steam. When the cold, laminated dough hits the hot oven, the minuscule pockets of water within the butter layers flash into steam. This steam expands violently, pushing the dough layers apart. Simultaneously, the melting butterfat coats the dough layers, preventing them from sticking together and effectively “frying” them into a crispy, flaky texture.
To achieve this effect, two conditions must be met: proper proofing and a high initial oven temperature. Proofing is the final fermentation stage before baking. It must be done carefully in a warm, humid environment (ideally 29-32°C). The goal is to get the yeast active enough to make the dough puffy and light, but not so much that the butter begins to melt and leak. A properly proofed croissant will “jiggle” slightly when the tray is shaken and will feel like a marshmallow to the touch. You should see the layers beginning to separate at the edges.
The second, and most critical, element is the oven temperature. You need an initial blast of high heat to create that rapid steam expansion. Professional baking techniques require that an initial heat of 400-425°F (200-220°C) is essential for this process. This high heat ensures the water turns to steam before the fat has a chance to fully melt and leak out. After the initial 5-10 minutes, the temperature is often lowered to allow the pastry to bake through and brown evenly without burning. Starting with a low oven temperature is a common mistake that leads to a dense, sad pastry with no lift, as the butter simply melts out before it can do its work.
Mastering this final stage is about orchestrating a controlled explosion. The careful work of building the layers provides the structure, and the final blast of heat provides the force that brings it to life, resulting in that sought-after crispy, airy, and beautifully layered interior.
Key takeaways
- Material Science is First: The entire process depends on using butter with at least 84% fat content to ensure structural stability and minimal water content.
- Temperature is a Tool: Lamination is an exercise in temperature management. The butter must be kept within its 13-16°C plasticity window at all times through regular and sufficient resting periods.
- Technique is Geometry, Not Force: Success comes from precise, even rolling and correct folding geometry, not from brute strength which destroys the delicate layer structure.
Waste problem: how to turn lamination scraps into sellable products?
After carefully trimming your dough to create perfectly shaped croissants, you are often left with a significant amount of scrap. A common instinct is to ball up these scraps and re-roll them, but this is the worst possible action. This process completely destroys the delicate, parallel layers you worked so hard to create, mixing the butter and dough into a homogenous, brioche-like mass. However, these scraps are valuable and contain perfectly good lamination. The key is to handle them in a way that preserves the layer geometry.
Professionals have a clear objective: maximize yield. While some waste is inevitable, industry standards indicate that 25% waste in laminated dough production is excessive, with a target yield of 75-80% being the goal. This is achieved through careful cutting patterns and, crucially, intelligent use of trimmings.
The correct method for handling scraps is to stack them. Lay the trimmed edges flat on top of one another to form a block. Do not press them down hard. Chill this block of stacked scraps thoroughly. Once cold, you can gently roll it out once more. This creates what is sometimes called a “rustic lamination.” The layers will not be as perfectly aligned as in the main dough, but the separation of butter and dough is largely preserved. This re-rolled scrap dough is perfect for a variety of valuable secondary products:
- Cinnamon Twists or Sugar Buns: Brush the rolled scrap dough with melted butter, sprinkle with cinnamon and sugar, cut into strips, and twist.
- Palmiers: Sprinkle the dough with sugar, fold the two long sides in to meet at the center, then fold in half again to create the classic “palm leaf” shape before slicing and baking.
- Cheese Straws: Sprinkle with grated cheese (like Parmesan or Gruyère) and a pinch of cayenne, cut into strips, and bake until golden.
- Mini Pastries: Even the smallest edge pieces can be gently rolled up, perhaps with a small piece of chocolate or nut paste, and baked off as bite-sized treats.
By treating scraps not as waste but as a different form of laminated dough, you can significantly increase your yield and create a profitable new range of products from what would otherwise be lost.
Mastering these principles transforms lamination from a gamble into a predictable engineering process. The path to a perfect, 27-layer honeycomb is not paved with hope, but built with a thermometer, a ruler, and a precise understanding of material science. Begin applying this geometric and temperature-focused approach to your next batch for measurable, repeatable, and deeply satisfying results.