In summary:
- Achieving a thin, snappy shell is not about a recipe, but mastering the physics of chocolate tempering to form stable Beta V crystals.
- Precise artisanal gestures, like scraping molds at a 45-degree angle and a two-phase vibration, are non-negotiable for a flawless finish.
- Controlling temperatures at every stage—from the filling to the mold itself—is the key to preventing defects and ensuring structural integrity.
- The perfect Belgian praline is a balance of contrasts: a robust, glossy shell that gives way to a delicate, flavourful filling.
The admiration for a true Belgian praline often begins before the first bite. It starts with the gleam of its flawless, glossy shell, followed by the clean, sharp ‘snap’ as it breaks. Many amateur chocolatiers, armed with high-quality chocolate and fine ingredients, find themselves frustrated. Their creations are delicious, yet they lack that signature delicacy. The shells are too thick, the finish is dull, and they sometimes melt too quickly in the hand. The common advice—”temper your chocolate properly”—is true, but it is a dramatic oversimplification. It overlooks the craft, the science, and the series of precise gestures that define Belgian chocolate-making.
The secret does not lie in a single trick, but in a philosophy of control. It’s about understanding why a chocolate sticks to its mold, what causes a tiny air bubble to mar the surface, and how a difference of two degrees in your buttercream can ruin a perfect shell. This is the art of mastering the underlying physics of crystallization and perfecting the artisanal gestures passed down through generations. The true challenge is not just melting and cooling chocolate; it’s about commanding cocoa butter to form the most stable, most brilliant structure possible: the Beta V crystal. This guide will not just give you steps; it will reveal the ‘why’ behind each critical action, transforming your process from simple assembly to true craftsmanship.
This article will deconstruct the techniques of a Maître Chocolatier. We will explore the nuances of creating the perfect filling, the meticulous methods for sealing and finishing, the science behind a stable temper, and the final touch of traditional packaging. Prepare to move beyond the recipe and embrace the discipline of Belgian chocolate artistry.
Summary: The Maître Chocolatier’s Guide to Perfect Pralines
- Almonds or hazelnuts: how to get the rustic grain of a true Belgian praliné?
- How to scrape the mold for a flat, sealed base?
- Coffee or vanilla: the secrets of light buttercream for filling Manons
- The mistake of not vibrating the mold, which leaves holes in the praline’s nose
- Ballotin box or sachet: how to pack to prevent pralines from bumping into each other?
- The filling error that creates unpleasantly thick shell bottoms
- Why does chocolate cooled too quickly melt instantly in your fingers?
- How to Distinguish Fat Bloom from Sugar Bloom on Aged Chocolate?
Amandes ou noisettes : comment obtenir le grain rustique du vrai praliné belge ?
The heart of many iconic Belgian chocolates is the praliné, a filling whose character is defined by its texture. This is not the smooth, homogenous paste found elsewhere. A true Belgian praliné possesses a rustic, heterogeneous grain that provides a delightful contrast to the smooth shell. This tradition of a textured filling is deeply rooted in our history; in fact, the invention of the Belgian praline dates back to 1912 when Jean Neuhaus Jr. first created these filled delights. The choice between almonds and hazelnuts is a matter of taste preference—almonds offer a creamier, more subtle flavour, while hazelnuts deliver a richer, more pronounced roasted note.
The secret to the texture lies not only in the nuts but in the caramelization and grinding process. The temperature of the caramel is paramount. For a softer, slightly chewy grain, the sugar should be heated to around 160°C (320°F). To achieve a crunchier, more brittle and classic rustic texture, one must be bold and push the caramel to 175°C (347°F). This higher temperature creates a harder candy that shatters into distinct fragments during grinding.
When grinding, the technique is as important as the ingredients. A food processor should be used in short, powerful pulses rather than a continuous blend. This approach breaks the caramelized nuts into small pieces without over-processing them into a uniform butter. The goal is to deliberately leave some nut fragments intact. This creates the signature mouthfeel. Finally, to manage the natural oil migration from the nuts, which can soften the chocolate shell over time, a small amount of stabilizing cocoa butter can be incorporated into the finished praliné. This maintains the integrity of the filling and the crispness of the shell.
Comment racler le moule pour avoir un fond plat et hermétique ?
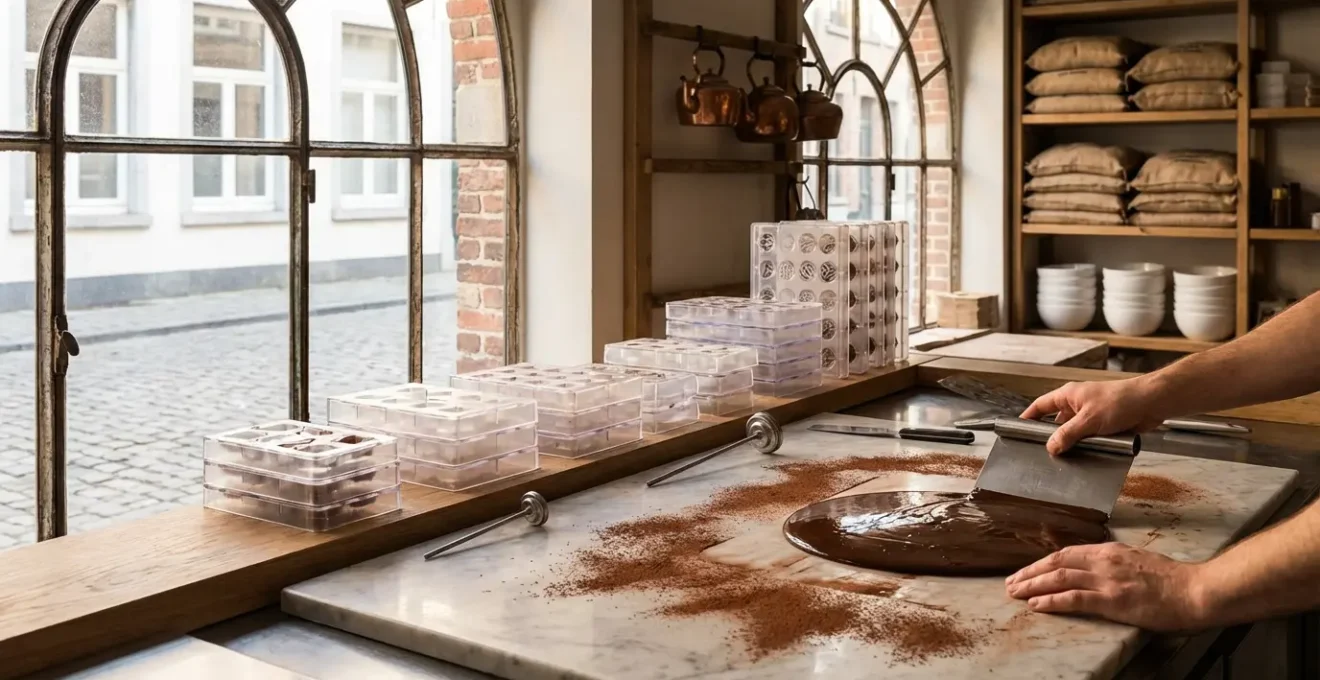
A praline with a rounded, thick, or incomplete base is the mark of an amateur. The flat, perfectly sealed bottom of a professional Belgian chocolate is not an accident; it is the result of a precise and uncompromising artisanal gesture: scraping. This step ensures the structural integrity of the praline, creating a hermetic seal that protects the delicate filling from air and moisture, thereby preserving its freshness. The tool for this task is a rigid metal bench scraper, and the technique requires both precision and confidence.
As demonstrated in professional training by chocolatiers at Callebaut, the process involves two distinct scraping phases. After filling the cavities of your polycarbonate mold with tempered chocolate and inverting it to drain the excess, the first scrape is performed. The mold is held at a slight angle, and the scraper, held at a firm 45-degree angle, is drawn across the surface in a single, clean motion. This removes the bulk of the excess chocolate from the top surface of the mold.
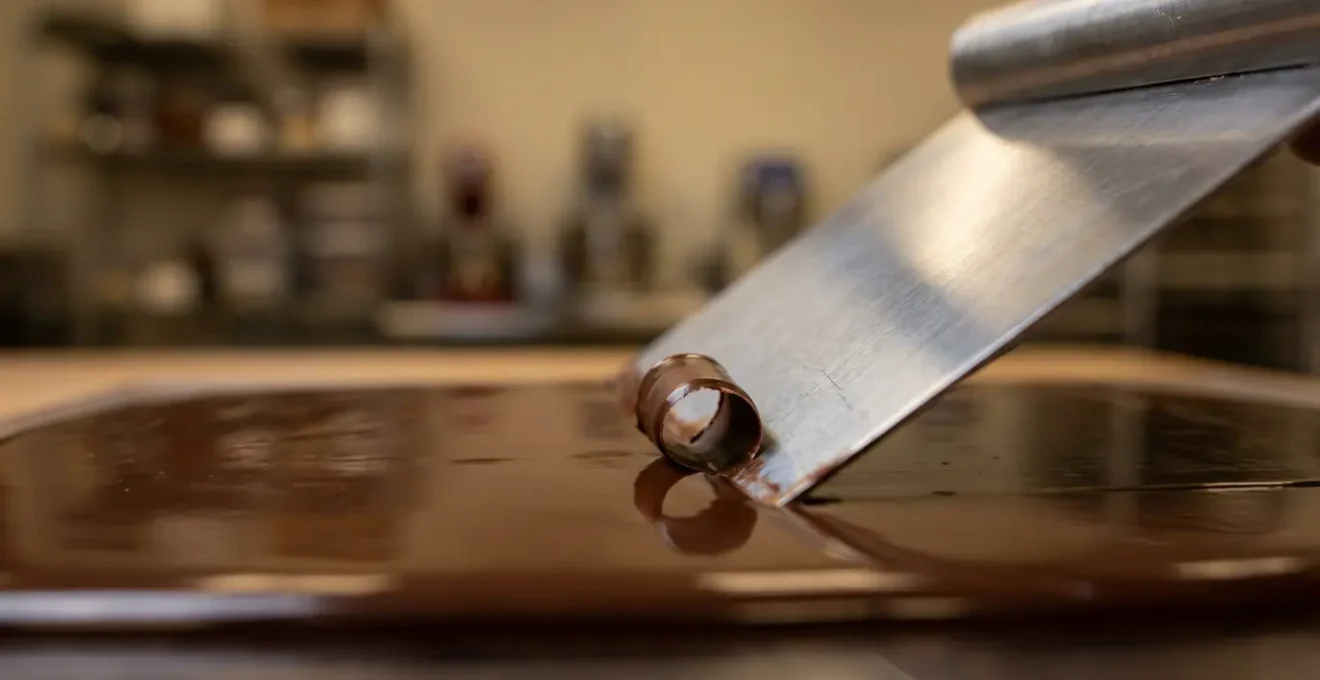
However, the work is not yet finished. The chocolate inside the shells will settle slightly. After about five minutes, a second, final scrape is essential. This removes the small ridge of chocolate that has formed around the edge of each cavity, ensuring a perfectly flat surface for the base. For this technique to succeed, thermal control is crucial. The molds must be pre-warmed to 26-27°C to prevent thermal shock, which would cause the chocolate to set too quickly and make a clean scrape impossible. This meticulous process is the only way to achieve that perfectly flat, professional finish.
Café ou vanille : les secrets de la crème au beurre légère pour garnir les Manons
The Manon is a quintessential Brussels praline, celebrated for its unique combination of a fresh, light buttercream filling, often flavoured with coffee, and a crisp white chocolate shell. While the original, as described by chocolatiers at Corné Port-Royal, was a creation of cream, nougatine, and walnuts dusted with icing sugar, the modern Manon is defined by its incredibly light and airy buttercream. Achieving this texture is an art, and it begins with choosing the right meringue base. A dense, overly sweet American-style buttercream simply will not do; it would overpower the delicacy of the praline and has poor stability.
The choice for a professional is between a Swiss or an Italian meringue buttercream. Both produce a far superior result in terms of texture and stability. The Swiss method involves heating egg whites and sugar over a bain-marie before whipping, resulting in a very stable and silky cream. The Italian method, which involves pouring hot sugar syrup into whipping egg whites, creates the most stable and lightest of all buttercreams, with excellent heat resistance. This makes it a superior choice for professional environments.
The following table, based on an analysis of buttercream methods for chocolate work, highlights the key differences.
| Method | Stability | Texture | Temperature Tolerance |
|---|---|---|---|
| Swiss Meringue | Very stable | Silky, light | Holds at 20-22°C |
| Italian Meringue | Most stable | Ultra-light, airy | Better heat resistance |
Regardless of the method, the final temperature of the buttercream is non-negotiable. It must be piped into the chocolate shells when it is at a critical piping temperature of 20-22°C (68-72°F). If the cream is too cold, it will be difficult to pipe and may not adhere to the shell. If it is too warm, it will melt the thin chocolate shell, leading to a catastrophic failure. This precise temperature control is what allows for the perfect marriage of a delicate shell and a luscious, light filling.
L’erreur de ne pas vibrer le moule qui laisse des trous dans le nez de la praline
One of the most telling flaws in a molded chocolate is the presence of small air pockets, particularly in the detailed corners or the “nose” of the praline. These imperfections are not merely cosmetic; they indicate a weakness in the shell’s structure and a failure in a fundamental step of the molding process: vibration. When tempered chocolate is poured into a mold, tiny air bubbles are inevitably trapped. Without proper vibration, these bubbles remain, creating voids and preventing the chocolate from making full contact with the mold surface, which results in a dull, pockmarked finish.
Simply shaking the mold is insufficient. Professional chocolatiers employ a deliberate, two-phase vibration technique to ensure a flawless shell. The first phase consists of several sharp, vertical taps of the mold on a solid work surface. This action dislodges the larger, more stubborn air bubbles that get trapped in the intricate details of the mold. The second phase involves a sustained horizontal agitation or shaking for 10-15 seconds. This encourages the smaller bubbles to rise to the surface and ensures the chocolate flows evenly, coating every part of the cavity for a uniform shell thickness.
To guarantee complete success, especially with highly detailed molds, it’s wise to pre-coat the most intricate details with a small brush before the main filling. Furthermore, maintaining the mold at an optimal temperature of around 23°C ensures the chocolate has the right fluidity to flow freely during vibration. A final visual check of every cavity after vibration is a mandatory quality control step before the chocolate begins to set. This meticulous attention to detail is what separates an acceptable chocolate from a perfect one.
Action plan: a two-phase vibration protocol
- Phase 1: Execute 3-5 sharp vertical taps on a solid work surface immediately after filling the mold.
- Phase 2: Apply sustained horizontal shaking for 10-15 seconds to release fine air bubbles and even out the chocolate.
- Pre-emptive coating: For highly intricate molds, use a small brush to pre-coat detailed corners with tempered chocolate before the main pour.
- Temperature check: Ensure the mold is maintained at approximately 23°C to guarantee optimal chocolate flow during vibration.
- Final inspection: Visually check all cavities after vibration to confirm they are completely filled and free of visible air pockets before cooling.
Boîte ballotin ou sachet : comment emballer pour éviter que les pralines ne s’entrechoquent ?
The final act of creating a Belgian praline is to ensure it reaches its destination in perfect condition. All the work of tempering, molding, and filling can be undone in an instant by poor packaging. Historically, pralines were sold in simple paper cones, which offered little to no protection, resulting in scratched and broken chocolates. The solution to this problem was a revolutionary Belgian innovation that has since become the global standard for luxury chocolate packaging: the ballotin.
As history records, the revolutionary ballotin packaging was created in 1915 by Louise Agostini, the wife of Jean Neuhaus Jr. Her ingenious design directly addressed the fragility of the praline. The ballotin is not just a box; it is a protective vessel. Its tapered shape and, crucially, its internal partitions or paper cups, are designed to cradle each chocolate individually. This prevents them from moving and bumping into each other during transport, preserving their delicate shells and intricate decorations. The ballotin elevates the praline from a simple confection to a protected jewel.
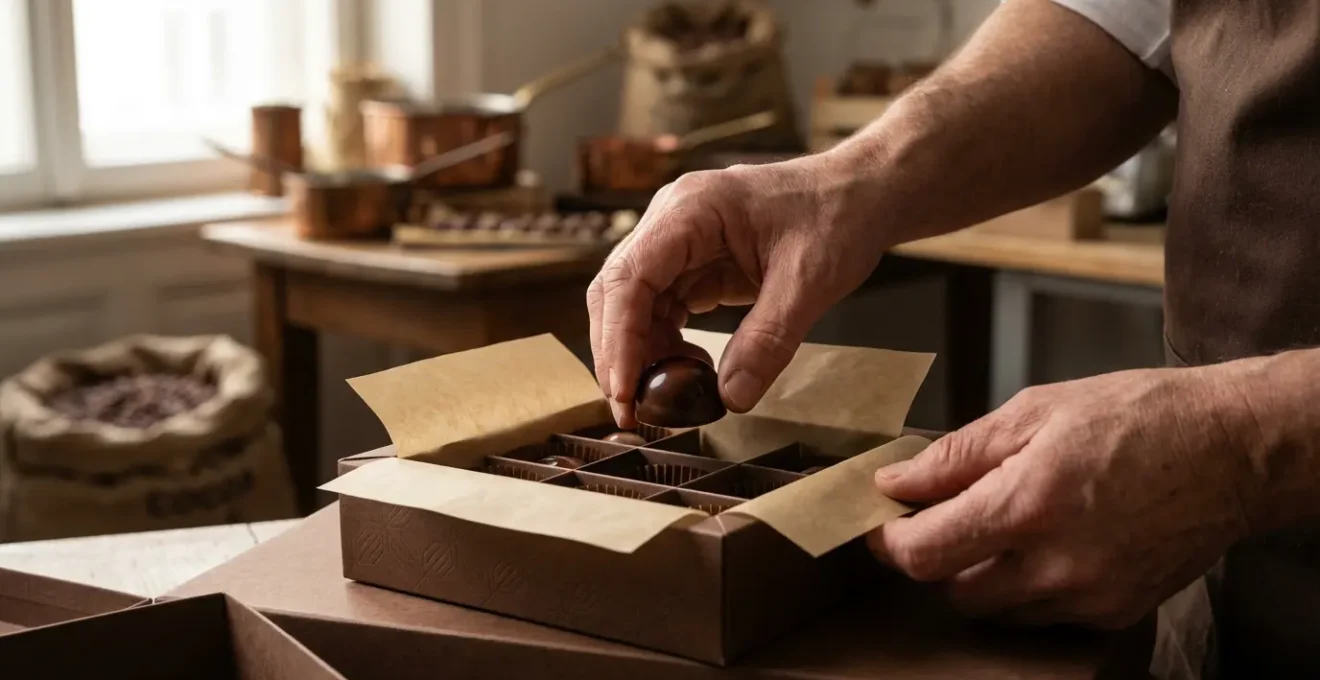
When packing pralines, whether in a traditional ballotin or another sturdy box, the principle remains the same: immobilization is key. Each chocolate should have its own compartment. If the box does not have built-in dividers, individual fluted paper or glassine cups must be used for each piece. The pralines should be arranged snugly, but not so tightly that they press against each other. For optimal preservation, especially for homemade pralines, they should be stored in a cool, dry place (around 18°C) and consumed within two to three weeks for peak freshness. A sachet or bag should only ever be considered for hard, single-origin chocolate squares, never for delicate filled pralines.
L’erreur de remplissage qui crée des fonds de coques trop épais et désagréables
The sublime experience of a Belgian praline lies in its textural contrast: a thin, crisp shell yielding to a soft, flavourful center. An overly thick base ruins this balance, creating a clumsy, heavy mouthfeel. This common flaw is not a problem with the chocolate’s temper or the mold; it is a simple but critical error of overfilling. When a chocolate shell is filled too close to the brim with its ganache or praliné, there is insufficient space for the final layer of chocolate that forms the base. This forces a thick, uneven cap to be applied, destroying the praline’s elegance.
The key to a delicate, perfectly proportioned base is a concept professionals call “headspace.” To allow for a thin, strong seal, one must never fill the chocolate shells completely. As a strict rule, professionals maintain exactly 1.5mm of headspace from the top edge of the shell. This tiny gap is the perfect volume to accommodate a final, thin layer of tempered chocolate, creating a seal that is both strong and elegant.
Achieving this precision requires a controlled filling process. A piping bag fitted with a correctly sized tip is essential for depositing the filling cleanly and accurately into each shell. One must fill each cavity individually, ensuring a consistent level across the entire mold. It is also vital to monitor the filling’s temperature; it must not exceed 28°C. A warmer filling will begin to melt the delicate, pre-made shell, compromising its structure. Finally, absolute cleanliness is paramount. Any smudges of filling on the rim of the mold will prevent the final chocolate seal from adhering properly, creating leaks and destroying the hermetic seal. This meticulous approach is the only way to ensure a refined and pleasant eating experience.
Pourquoi un chocolat refroidi trop vite fond-il instantanément dans les doigts ?
The ultimate sign of a perfectly tempered chocolate is its resistance to melting in your fingers. A chocolate that immediately becomes sticky and soft to the touch is a product of improper crystallization, a direct consequence of cooling too quickly or at the wrong temperature. The ‘snap’ and gloss of a fine chocolate are not just aesthetic qualities; they are the physical manifestations of a stable crystalline structure within the cocoa butter. This ideal structure is known as the Beta V crystal.
When chocolate is tempered correctly, the cocoa butter molecules are encouraged to align into this stable Beta V form. These crystals are dense and compact, creating a chocolate that is firm, contracts as it cools (which is why it releases easily from the mold), and has a high melting point. In fact, scientific research confirms Beta V crystals melt at a 30.0-34.5°C melting range, which is just below human body temperature (37°C). This gives it that luxurious, slow melt-in-the-mouth sensation, but allows it to remain solid when handled briefly.
If chocolate is cooled too rapidly, or without proper agitation, the cocoa butter does not have time to form these stable crystals. Instead, it solidifies into a chaotic mix of unstable crystal forms (like Alpha, Beta Prime, and Gamma crystals). These structures are loose, weak, and have a much lower melting point. This is why such a chocolate feels soft, looks dull, and melts almost instantly upon contact with the warmth of your fingers. The science is clear, as described in foundational studies on the subject:
Form V crystals result in a chocolate that contracts and releases from a mold, has a nice shine or even a gloss if formed in a smooth shiny mold cavity, breaks cleanly with a snap, and has a very smooth melt in the mouth.
– R.L. Willie and E.S. Lutton, Polymorphism of Cocoa Butter study
Therefore, the patience taken during the cooling and tempering phase is a direct investment in the final quality and stability of the praline. Rushing this step is a guarantee of failure.
Key takeaways
- Mastery of Beta V crystal formation through precise tempering is the non-negotiable foundation for a glossy, snappy, and stable chocolate shell.
- The textural contrast between a thin, crisp shell and a delicate filling is sacred; this is achieved by respecting the 1.5mm headspace rule during filling.
- Perfection lies in the artisanal gesture: the two-phase vibration to eliminate air bubbles and the double-scrape technique for a flawless, hermetic seal are mandatory skills.
How to Distinguish Fat Bloom from Sugar Bloom on Aged Chocolate?
Even a perfectly crafted chocolate can develop a whitish or greyish coating over time, a phenomenon known as “bloom.” This is often mistaken for mold, but it is simply a physical change in the chocolate’s surface. There are two distinct types of bloom, and a chocolatier must be able to distinguish between them: fat bloom and sugar bloom. They have different causes and different appearances.
Fat bloom is the most common type. It appears as a greasy, soft, greyish-white film or streaks on the surface of the chocolate. If you touch it, it feels slick and will likely melt onto your finger. This bloom is caused by the migration of cocoa butter crystals to the surface. This can happen due to improper tempering (the unstable crystals re-form over time) or, more commonly, due to temperature fluctuations during storage. When the chocolate is exposed to warmth, the cocoa butter melts, and as it re-solidifies, it forms large, unstable crystals on the surface. While visually unappealing, chocolate with fat bloom is perfectly safe to eat and its flavour is largely unaffected. It can even be re-tempered to restore its original appearance.
Sugar bloom, on the other hand, is caused by moisture. If chocolate is stored in a humid environment or moved from a cold to a warm place (causing condensation), the moisture dissolves some of the sugar on the surface. When the water evaporates, the sugar recrystallizes into a fine, granular coating. This bloom looks like a dull, dusty, or sometimes spotty white layer. To the touch, it feels dry and gritty, not greasy. Unlike fat bloom, sugar bloom permanently affects the texture of the chocolate, making it feel grainy in the mouth. It is also safe to eat, but the damage to the texture is irreversible. The best way to distinguish them is the finger test: if it’s greasy, it’s fat; if it’s gritty, it’s sugar.
Creating authentic Belgian pralines is an act of discipline. It demands respect for the material, precision in the execution, and a deep understanding of the science that governs the final result. From the rustic grain of the praliné to the final snap of the shell, every detail is a testament to this philosophy. Begin your journey to mastering this craft today; precision and patience are your most valuable ingredients.